
The summer almost got away from me. Here it is, nearing the end, and all I had done with the delicious summer produce was snack on it. Not that that's a bad thing. But I knew that, before summer was over, I wanted to take that beautiful fruit and transform it into something else delicious.
So, we took a family trip to the local farmers market to see what was available. I came home with two pounds of blueberries and 4 pounds of peaches from Frecon Farms in Boyertown, PA. I love knowing that the produce was grown just about 40 miles away. Talk about local! I checked out their website, and they do various "Pick Your Own" events throughout the year, with raspberries, apples, pears, and pumpkins coming up next. I'd love to go up there and participate!
So anyway, 2 pounds of blueberries (check out this post to see what I did with the peaches!) … what could I do with blueberries that would really let their flavor stand out? I don't know about you, but the first thing that came to my mind was pie.
Are you thinking, "Pie?!? But that takes forever!" Not in this household. And I even made my own crust. My secret? My food processor.
Pie is really personal for some people — some swear by an all-butter crust, some do a butter/shortening blend. I'm an all-butter person. Butter creates a flakier crust with a nicer, melt-in-your-mouth feel. Some people add shortening to make a more tender crust, but the crust won't flake, won't taste as good, and I don't like the film I get in my mouth after eating something with shortening.
Everyone is impressed when they get pie with a homemade pie crust, probably because people think it takes so long, and it's so hard. And pie crust can be a finicky thing. There are a few tricks:
- Cut your butter into cubes and freeze it until you're ready to use it.
- Touch the dough as little as possible -- that includes both with your hands, and with your rolling pin.
Having the butter cold when the pie goes into the oven is what helps create flakiness. Using chilled butter in the initial mixing process ensures flakes of butter throughout the flour, rather than a creamed cookie-dough type mixture. Touching the dough during the rolling process melts the butter too soon, before the pie goes into the oven. Not only does this prevent proper flaking as the pie bakes, it also makes your dough more prone to sticking during rolling.
Too much rolling forms too much gluten, giving you a chewy, rather than tender, crust. It should only take a couple of rolls to get the pastry into a thin circle. Don't overthink it, just roll it. If you find you've over-rolled your crust, cover it in plastic wrap and walk way for 5 to 10 minutes. This lets the gluten relax again.
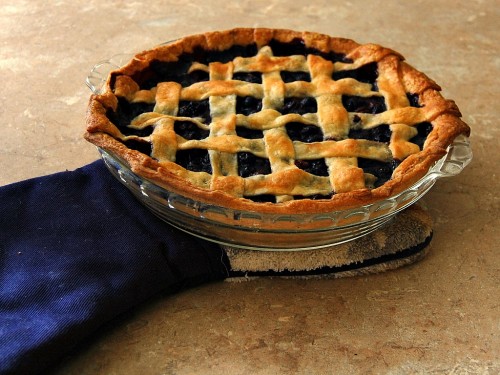
If you REALLY want to impress your friends and family, put a fancy crust on top of your pie. Lattice crusts look intricate and complicated, but they are very easy.
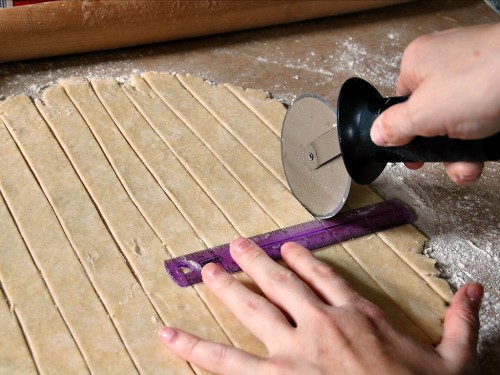
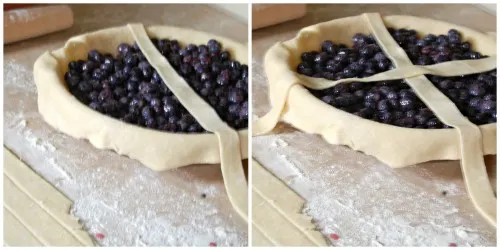
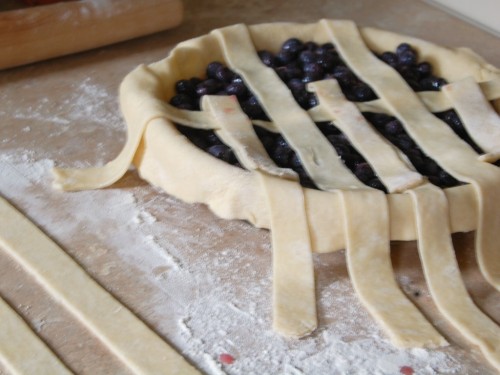
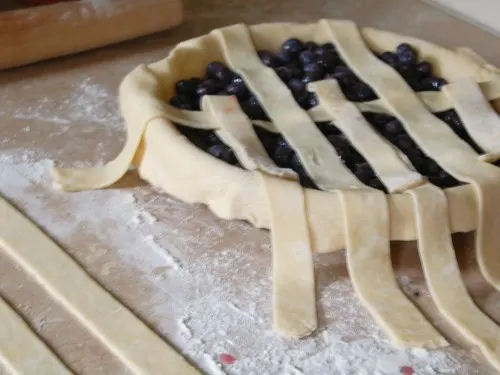
First, place your bottom crust in the pie pan, and place your filling in the crust. Then, roll out a second pie crust, and cut it into 1-inch thick strips with a pizza cutter. You'll need at least 20 strips.

Place one of the strips across the center of the pie. Place a second strip perpendicular to the first.

Place another strip next to the first one, over top of the perpendicular strip,then gently fold the perpendicular strip back over it.
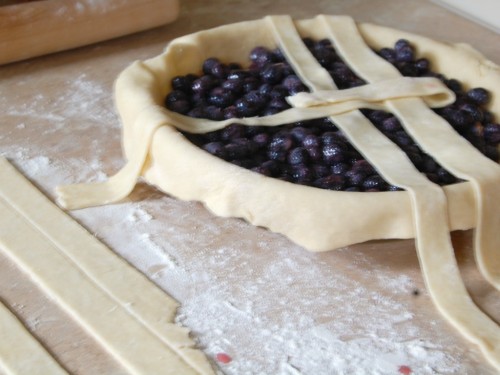

Place another strip next to the last one, and unfold the perpendicular strip back over top. The perpendicular strip should now go over the first one, under the second one and over the third one. Repeat on the other side of the first strip.
Turn the pie 90 degrees, and gently fold back every other strip.
Lay a strip down, unfold the folded strips back over the pie, and fold the ones back that had been laying flat. Lie another strip down. Repeat one more time, then turn the pie 180 degrees, and repeat with the remaining side.
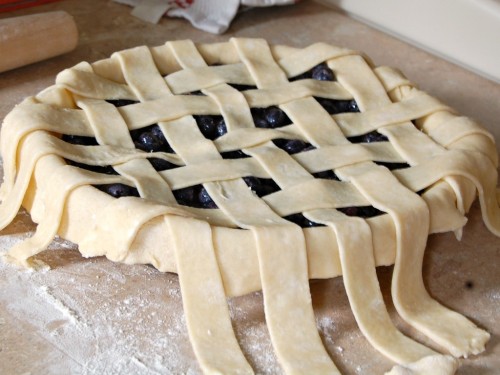
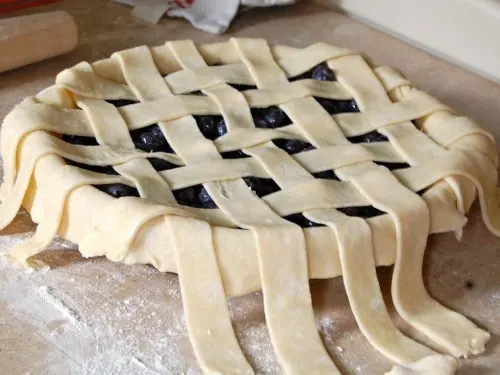
Use scissors to cut off any overhang, and gently press the lattice strips into the edges of the lower crust.
This pie crust recipe and lattice crust method can be used for any flavor of pie, I just happened to make mine with blueberries.
Wait until the pie cools to room temperature before slicing. As you can see in the photo below, I got impatient, and the filling hadn't set yet.
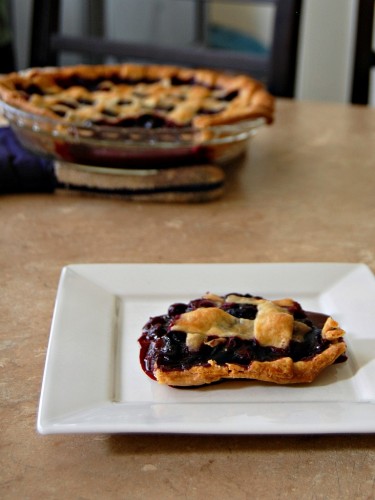

Blueberry Pie with Lattice Crust
Crust recipe from Simply Recipes; filling barely adapted from Tide and Thyme
Ingredients
For the crust:
- 2 ½ cups (10 ⅝ oz) all-purpose flour
- 1 teaspoon salt
- 1 teaspoon sugar
- 6 to 8 tablespoon ice water
- 1 cup (2 sticks or 8 oz) unsalted butter, cut into cubes, very cold
For the filling:
- 4 cups blueberries, rinsed and picked clean of stems
- 1 tablespoon freshly squeezed lemon juice
- ¾ cup (5 ¼ oz) sugar
- 4 tablespoon cornstarch
- ½ teaspoon lemon zest
- ¼ teaspoon salt
- ¼ teaspoon cinnamon
- 1 tablespoon unsalted butter, cold
Directions
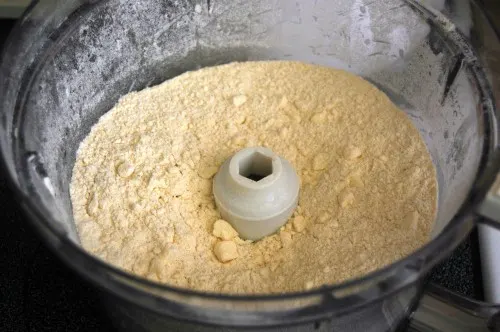
- Place the flour, salt and sugar in the bowl of a food processor. Quickly pulse two or three times to evenly distribute.
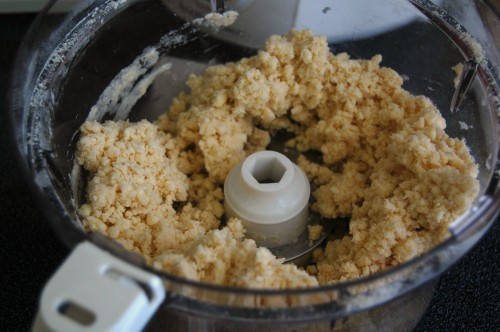
- Add the cubes of butter to the flour mixture, and quickly pulse 8 to 10 times, until the mixture resembles a coarse meal.

- Add 6 tablespoon of the ice water, and pulse two or three times. Check to see if the mixture now resembles large, moist clumps. If not, add another tablespoon, and pulse two more times, then check, and add another tablespoonful of ice water if needed.
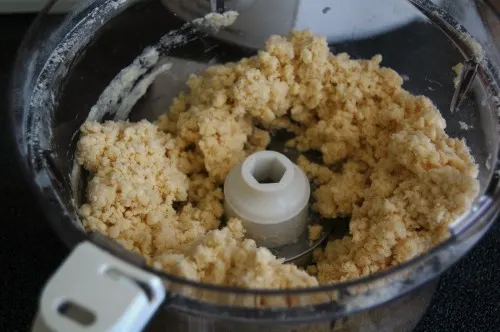
- Place two squares of plastic wrap on the counter. Divide the mixture evenly between the two (each should weigh about 11 ounces). Press the dough into a mound, then flatten into a disc. Wrap the plastic wrap around each disc, and refrigerate.
- While the dough is chilling, place the rinsed blueberries in a large non-metal bowl. Add the lemon juice and toss to coat.
- In a smaller bowl, whisk together the sugar, cornstarch, lemon zest, salt and cinnamon. Add the mixture to the blueberries, and gently fold until all of the blueberries are coated and the dry ingredients are moistened.
- Remove one disc of pie dough from the refrigerator. On a liberally floured surface, roll the dough out to about 12 inches in diameter, about ¼ of an inch thick. Gently roll the dough onto your rolling pin, and then unroll into a 9-inch pie plate. Gently prick the dough all over with a fork.
- Scrape the blueberry filling into the pie plate.
- Remove the second disc from the refrigerator, and roll into a 12-inch circle, ¼ of an inch thick. Follow the instructions in the blog post above to cut into 1-inch strips and weave into a lattice crust.
- In a small bowl, thoroughly whisk together one egg with two tablespoons of water. Use a pastry or basting brush to gently brush the egg wash onto the pie crust. Try not to get too much in the filling.
- Place the pie in the oven and bake for 50 to 60 minutes, until the crust is golden brown and the filling is bubbly.
Number of servings (yield): 8 servings
Goat Cheese Ice Cream with Roasted Peaches by The Redhead Baker
Wednesday 1st of April 2015
[…] I mentioned last week, it felt like the summer was getting away from me, and I hadn’t really had the opportunity to […]
Maureen | Orgasmic Chef
Saturday 14th of March 2015
I grew up in Maine with the best native blueberry pies that my mother made every week. Your pie is gorgeous and brings back the best memories.
Kylee
Wednesday 21st of August 2013
That, my dear - is a thing of beauty!