This post was created for #HalloweenTreatsWeek! I was sent products by some of the sponsor companies but as always, opinions are 100% mine.
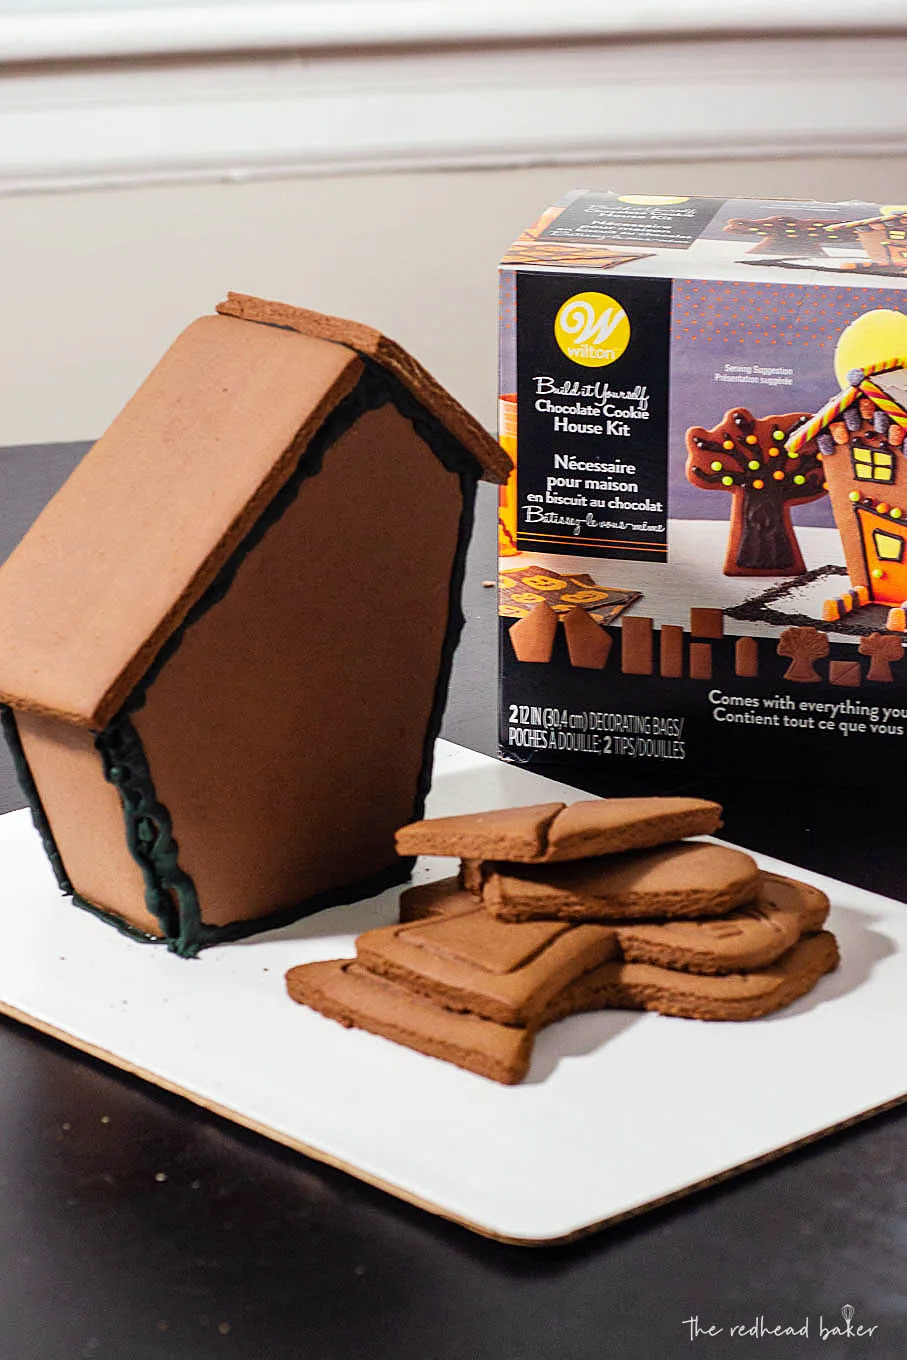
Wilton makes it easy to create a spooky haunted Halloween cookie house with their kits, which include pre-made cookie house pieces, trees, and candy decorations. You can also incorporate other Wilton products!

I love making gingerbread houses. I made a Christmas one that received honorable mention in a local gingerbread house contest.
But making them, especially from scratch (baking the gingerbread panels yourself), is hard. I love that Wilton makes these easy-to-use kits! They make the panels, you glue them together with icing, and decorate!

I used Wilton's Build-It-Yourself Chocolate Cookie House Kit. The kit includes the pre-baked panels, three different colors of icing, candy decorations and a bit of yellow fondant.
The box offers two different photos for decorating inspiration, but feel free to create your own. Also, don't forget to stop by your local arts and crafts store, or shop online to get additional Wilton products to use in your decorating! So, here are some tips and tricks for Halloween Cookie House decorating success!

Plan Ahead
Once you pipe the icing on, it starts to dry and loses its "glue-y-ness" quickly. Determine ahead of time where each of the panels of theHalloween Cookie House goes. Lay out your house and surrouding pieces before you begin.
Be Patient
I know I just said that the icing starts to dry quickly. However — the house will need to sit for 3 to 4 hours for the icing to fully harden. What I do is glue one panel to the cake board, and hold it upright with two full cans of soup. Then I glue the other three panels on. After a few hours, I remove the inner can, and then glue on the roof.

Help! I ran out of icing!
If you're heavy-handed with the icing, you may run out before you're done decorating your Halloween Cookie House. But don't worry! You can make more with Wilton's meringue powder, plus some powdered sugar and water. You can add food coloring, and use different piping tips to make piped decorations on the house (using a star tip along the sides of the house looks nice).
Avoid humidity
If possible, work in a cool, dry area. Humid days are not great for assembling gingerbread or cookie houses, because it makes the icing glue take longer to dry. If you can't wait for a non-humid day, running a dehumidifier (or the air conditioner) while you work is an option.

Get organized
Use a large ice cube tray and/or a muffin tin to organize your candy decorations. This will allow you to open the packages, but keep them contained.
Keep your icing and fondant covered
It's important to keep your frosting and fondant covered when not actively using them. The icing will harden, and so will the fondant. Close the icing bags with rubberbands, cover the tip of the filled icing bag with a damp paper towel, and keep the fondant wrapped in plastic or inside a zip-top bag.
Keep it safe!
While the icing is drying, and once the house is finished, keep your Halloween Cookie House safe! If you have young children or pets, make sure the house is kept out of reach! Kids will damage the house, and chocolate, in certain quantities, can be lethal for both dogs and cats.
That being said, this is a fun afternoon project for the whole family! Little kids can place the candies after the icing is piped, and older kids can write on the gravestones (my 8-year-old wrote on the ones in the pictures).

Haunted Halloween Cookie House
Wilton makes it easy to create a spooky haunted Halloween cookie house with kits, which includes pre-made cookie house pieces, trees, and candy decorations. You can also incorporate other Wilton products!
Materials
- Wilton Build-It-Yourself Chocolate Cookie Halloween House Kit
- Cake board
- Wilton Spooky Shapes Halloween Sprinkles
- Wilton Black Sparkle Gel
- Wilton Graveyard Cupcake Decorating Kit
- Wilton Pumpkin Royal Icing Decorations
- Light corn syrup
Tools
- Fondant roller
- Ruler
- Paring knife
- Offset spatula
Instructions
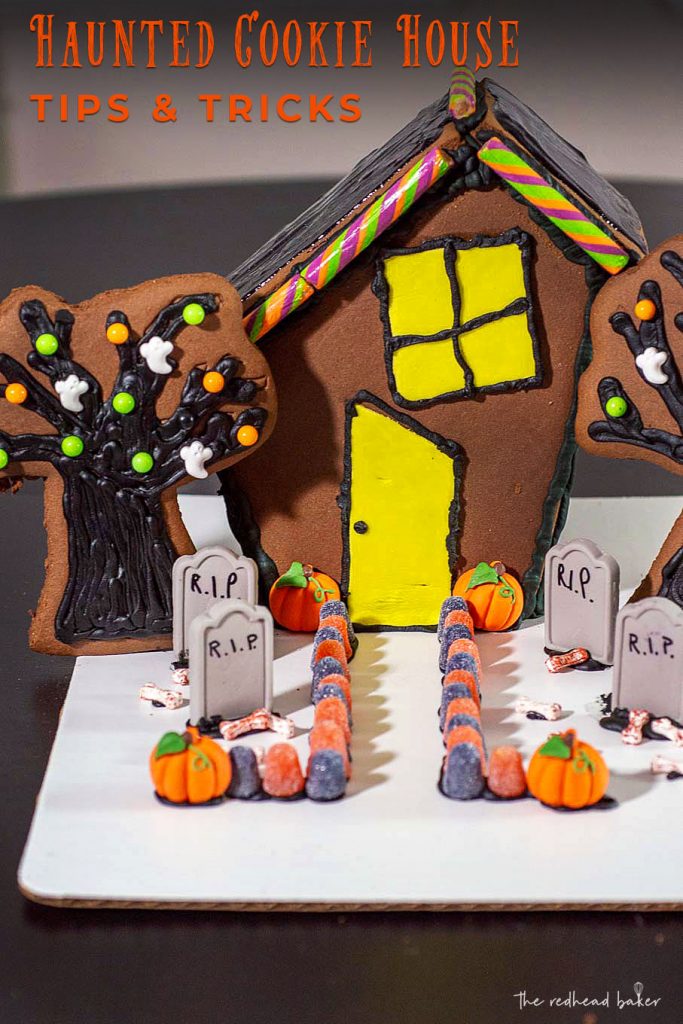
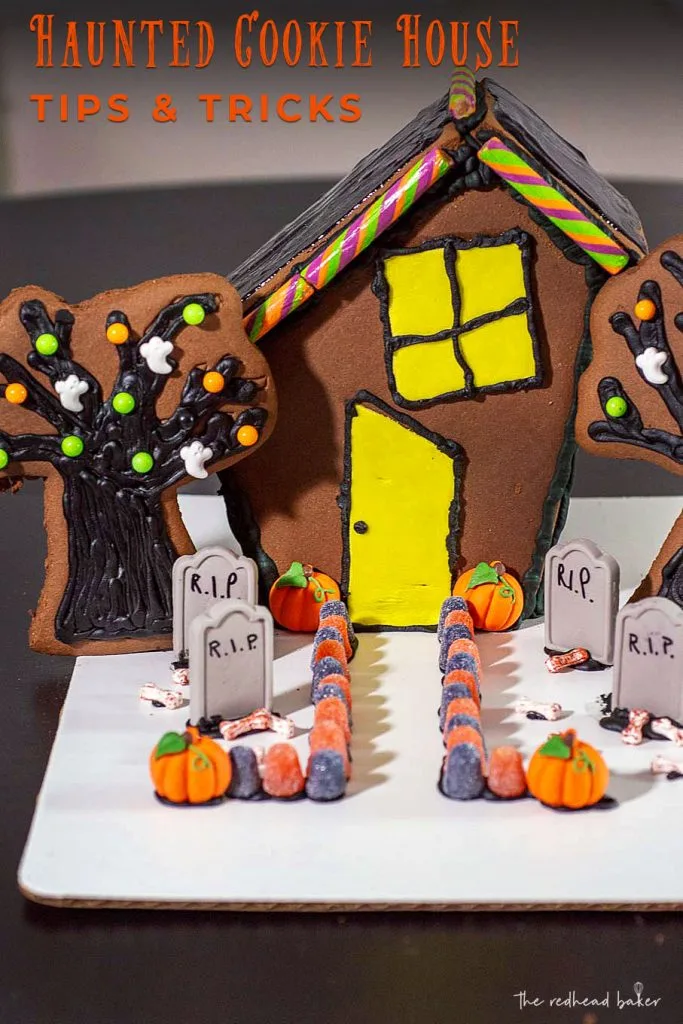
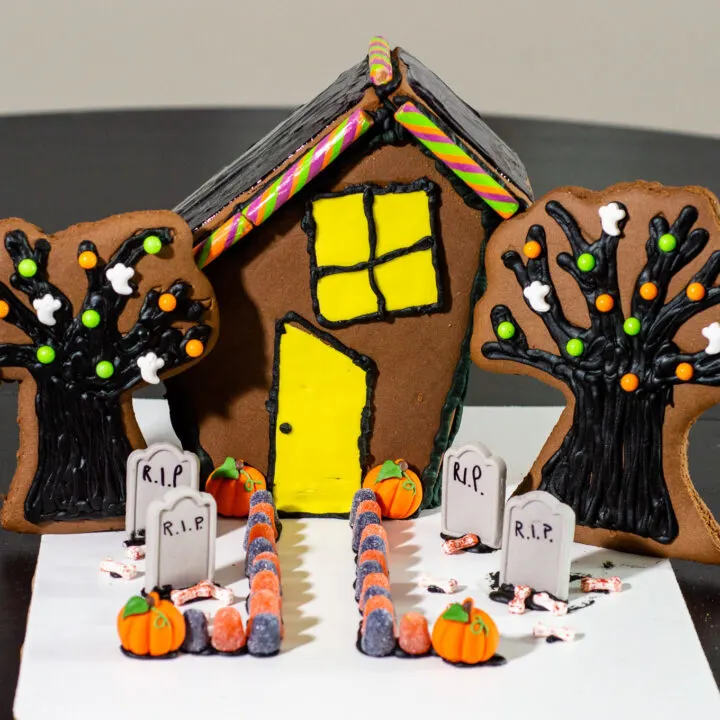
- Assemble the six house pieces according to the kit directions, then the trees, using the black icing to "glue" the pieces together.
- Let sit for 3 to 4 hours for the icing to dry.
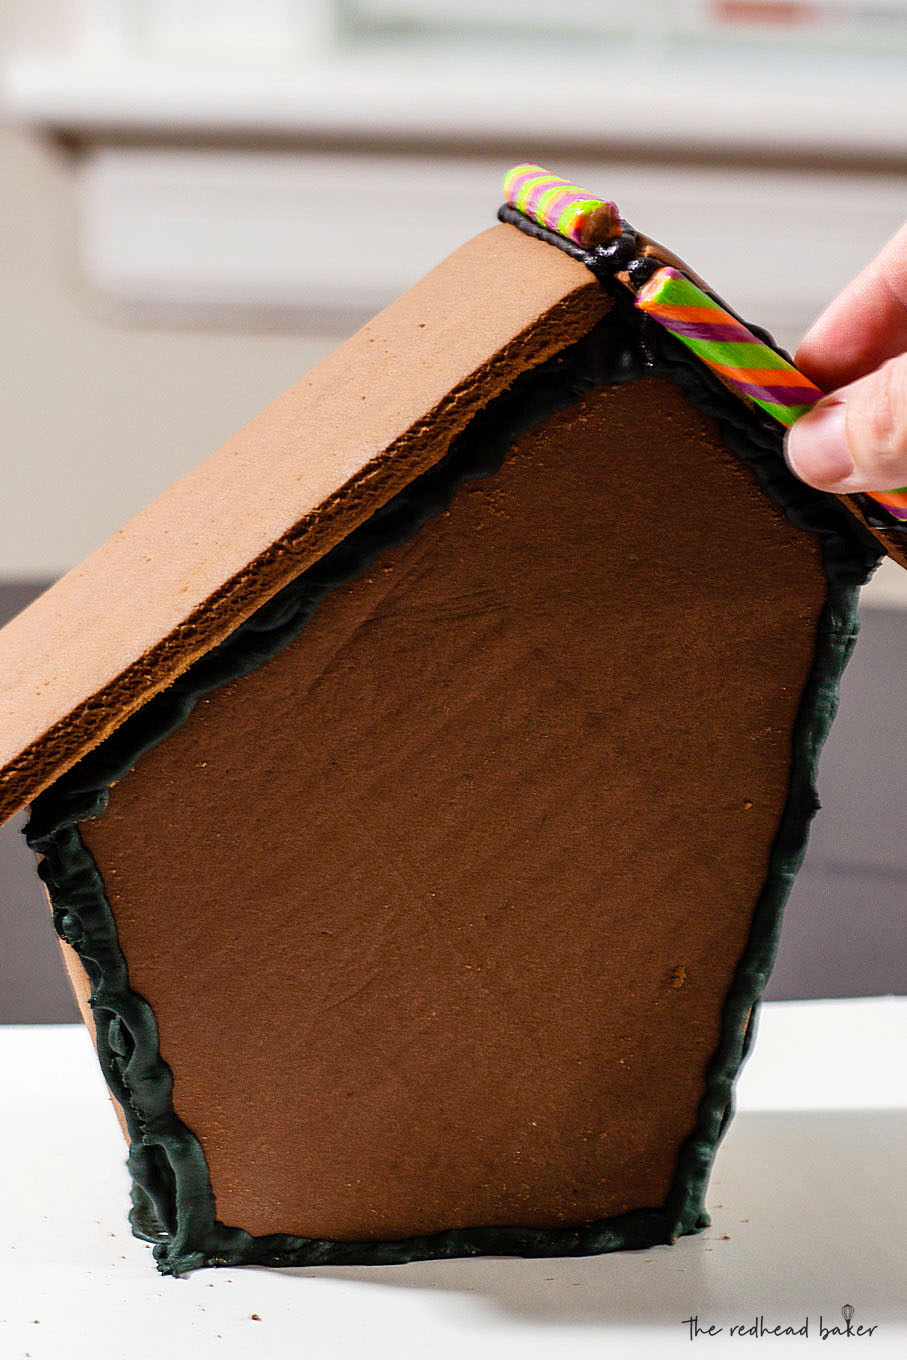
- Pipe a line of icing along one side of a candy cane (included with the kit), and attached it to the line where to the two roof pieces touch.
- Repeat with the other three candy canes, attaching them to the eaves of the roof on the front of the house.
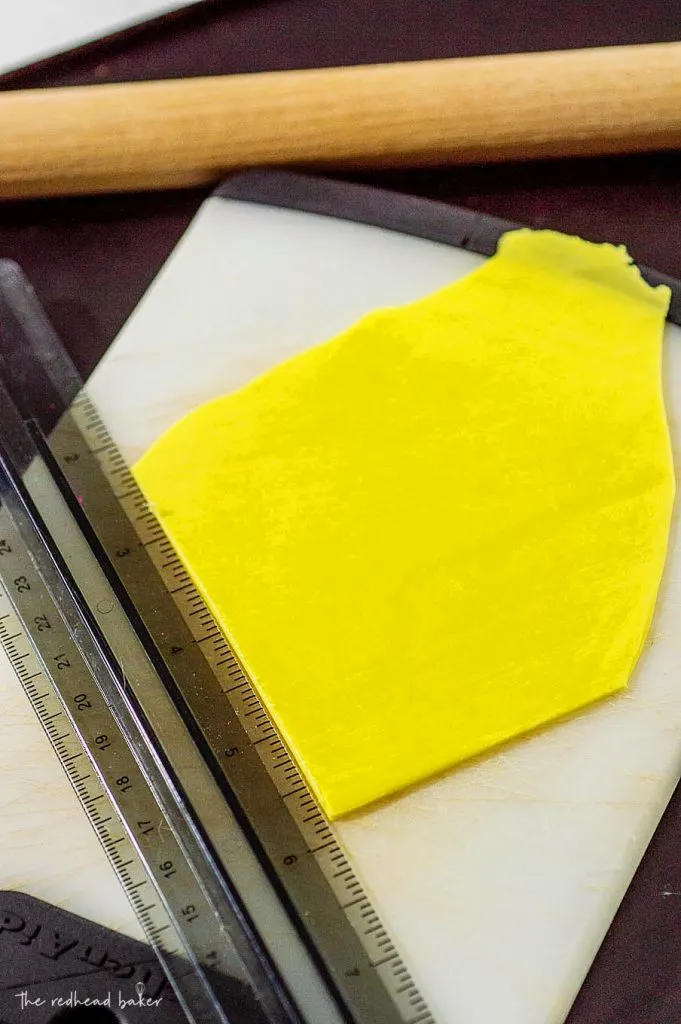
- Roll the fondant out to ⅛-inch. Use a ruler and a paring knife to cut out a door and a window.
- Dab a very thin layer of corn syrup on the back, then glue onto the house. Pipe an outline around each, and panes on the window.
- Pipe a walkway on one side of the door. Attach the sour gummies to the icing. Repeat on the other side of the door.
- Use icing to attach the royal icing pumpkins to the sides of the door, and to the ends of the walkway.
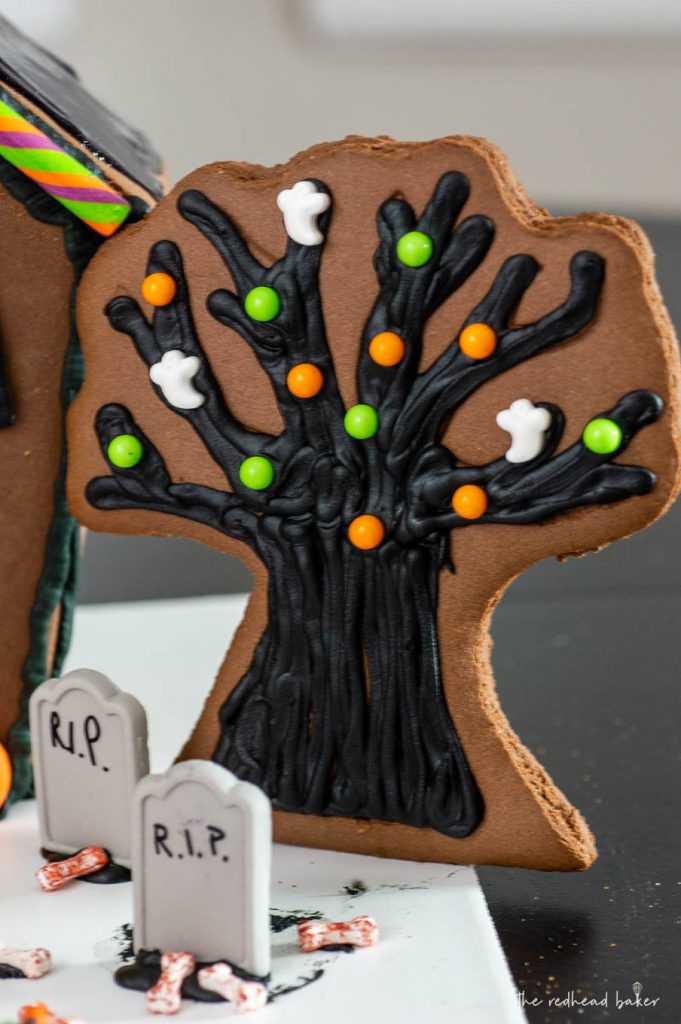
- Outline and fill in the imprint on one of the tree cookies. Attach the colored candy balls, and a few ghosts from the Spooky Shapes sprinkles. Repeat with the second tree.
- Write on the gravestones with the food-safe pen that comes with the graveyard kit. Attach to the cake board with some of the icing. Attach a few of the graveyard kit bones to the graves and the cake board.
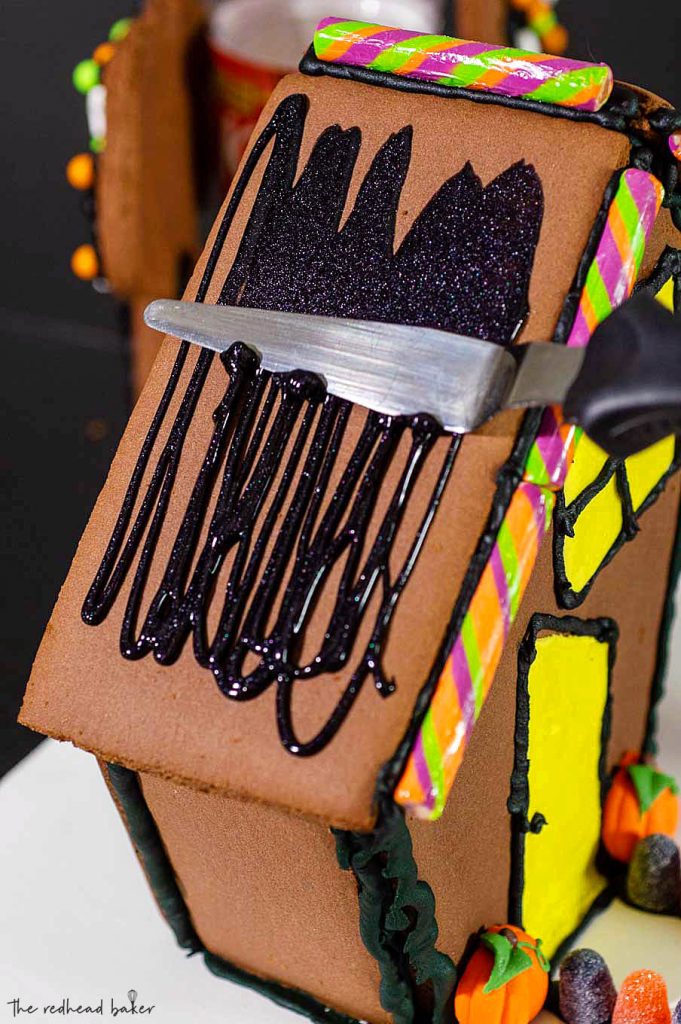
- Drizzle some of the sparkle gel on the roof panels. Use the offset spatula to gently spread it evenly over the roof panels.
Recommended Products
As an Amazon Associate and member of other affiliate programs, I earn a small percentage from qualifying purchases.


- BloodShot Eyeball Chocolate Apple Slices from Big Bear's Wife
- Halloween Sugar Cookie Bars from Fake Ginger
- Day of the Dead Mexican Hot Cocoa from Hezzi-D's Books and Cooks
- Gluten Free Graveyard Dirt Cake from Frugal & Fit
- Sugar Skull S’mores Cheesecake from Cookaholic Wife
- Jack Skellington Peanut Butter Cups from Cheese Curd In Paradise
- Hocus Pocus Potion from Jen Around the World
- Halloween Puppy Chow from Daily Dish Recipes
- Halloween Spooky Finger Cupcakes from Everyday Eileen
- Ghostly Halloween Brownie Cupcakes from Sweet Beginnings
- Halloween Chocolate Crack from Back To My Southern Roots
- Frosted Halloween Sheet Pan Cookies from Creative Southern Home
- Slime Lava Cakes from The Spiffy Cookie
- Monster Mash Halloween Edible Cookie Dough from Strawberry Blondie Kitchen
- Monster Macaron from A Kitchen Hoor's Adventures
- Dia de los Muertos Cake from Lemon Blossoms
- Ghoul's Blood Cocktail from West Via Midwest
- Halloween Pretzel Owls from Karen's Kitchen Stories
- Haunted Halloween Cookie House from The Redhead Baker
- Black Cat Brownies from Jonesin' For Taste
- Frankenberry Berry Hand Pies from Sweet ReciPEAs
- Bat-tastic Caramel Apples from The Beard and The Baker
- Haunted House Cupcake Tower from Pint Sized Baker
- Halloween Mummy Pizza Toast from Katie’s Cucina
- Sanderson Sisters Cocktails from Love and Confections
- Ghostly Pumpkin Custards from My Sweet Zepol
- Cinnamon & Sugar Pretzel Bones from Savory Moments
- Halloween Candy Kabobs from Intelligent Domestications
- Halloween Hand Pies from A Blender Mom
- Halloween Dessert Board from Books n' Cooks