This adorable snow globe cake is a delicious centerpiece for your holiday dessert table. Large crowd? Make more than one!

Welcome to #ChristmasSweetsWeek 2019! Co-hosted by Terri from Love and Confections and Christie from A Kitchen Hoor’s Adventures! What better way to celebrate the holidays than with food and fun? 25 bloggers from around the country have come together to share some of their favorite sweet Christmas recipes!! Deck the halls and get ready for very merry sweet treats, like fudge, cookies, Christmas morning breakfasts, layer cakes, cocoa, and more! Follow along on social media with our #ChristmasSweetsWeek hashtag. Happy Holidays!

Usually, if I'm making a cake for a holiday, I'll do it through flavors — pumpkin for Halloween, lemon for Easter. Other times, I'll do it through decorations.
You can use any flavor of cake — storebought mix or homemade from scratch — for this cake. If you use a mix, you'll get three six-inch layers. I freeze the third layer for another use.
You can find 6-inch cake pans, the bubble bowl, the food coloring, fondant, and cake decorating tools at your local craft store or online. Everything except the bubble bowl will be in the baking section; I found the bubble bowl in the floral section with the vases. I really wanted one without the ruffled opening, but those had patterns etched into the glass.
A cake decorating turntable is optional, but still helpful. With a cake this small, I use a small offset spatula (about 4.5 inches in length) rather than a large one (7.5 inches in length).


Yes, you'll use only a small amount of the red, orange and black fondant, but the good thing is that, stored properly, fondant can last years. And to be frank, most people don't like the taste of it and won't eat it, anyway.
And of course, feel free to change up the decorations under the bubble! If you'll be having a large crowd, make more than one snow globe cake, and decorate each differently for a dessert table that will wow your guests!

Snow Globe Cake Tutorial
This adorable snow globe cake is a delicious centerpiece for your holiday dessert table. Large crowd? Make more than one! #ChristmasSweetsWeek
Materials
- Cake board, about 8 inches in diameter
- Two 6-inch cake layers, any flavor, leveled
- 3 to 4 cups of vanilla frosting
- "Sky Blue" food dye
- "Forest Green" food dye
- 8 oz white fondant
- 4 oz red fondant
- 4 oz orange fondant
- 4 oz black fondant (or a black edible marker)
- 1 sugar ice cream cone
- Red bead sprinkles
- Yellow star-shaped sprinkle
- Powdered sugar
- Cornstarch
- Bubble bowl (glass or plastic)
Tools
- Cake turntable
- Offset spatula
- Small wooden dowel or rolling pin
- Craft knife
- Water
- Small paintbrush
- Disposable decorating bag
- Decorating coupler
- 1 small open-star tip
Instructions
- Place a dollop of frosting in the center of your cake board. Place one cake layer, cut-side up, on top of the frosting.
- Take about ¾ of your vanilla frosting, and place in a medium mixing bowl. Add two or three drops of sky blue food dye. Whisk well, until evenly distributed.
- Place about ¼ cup of frosting on the cake layer and smooth it with an offset spatula. Place your second cake layer, cut-side down, on top of the frosting.
- Coat the entire cake in a thin layer of icing (called a "crumb coat"). Chill the cake for 15 minutes.
- Once chilled, coat the cake in a thicker layer of frosting. Smooth it out with an offset spatula. Set the cake aside.
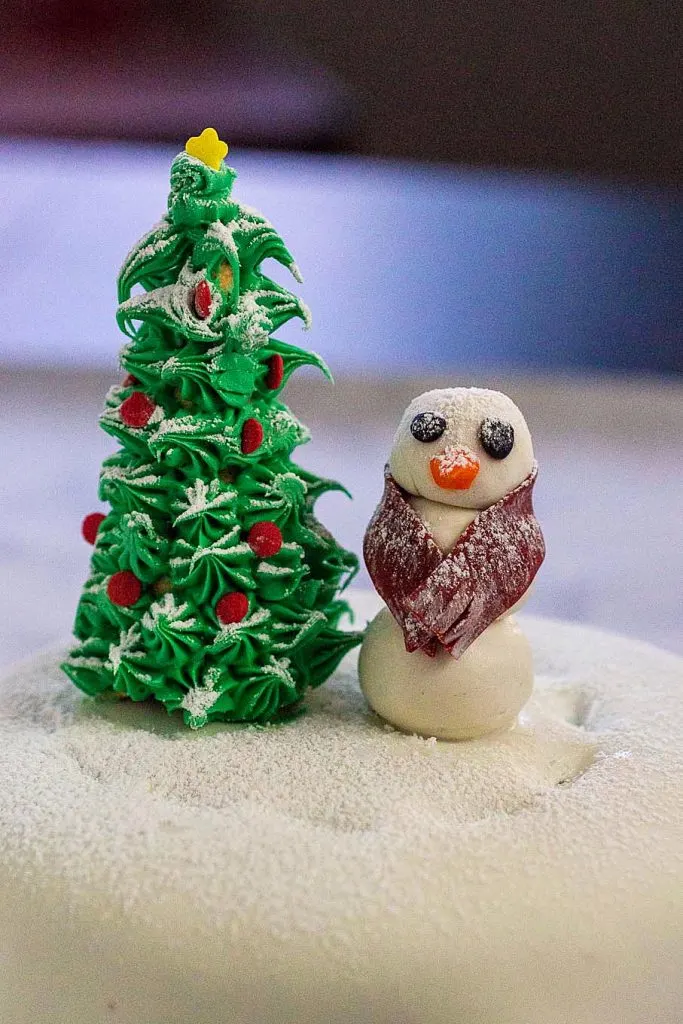
- Break off a walnut-sized ball of white fondant. Then break off two more, each one just slightly larger than the last. Roll each into a round ball with your hands.
- Use the paintbrush to add a few dabs of water on the tops of the larger two balls. Stack the balls together to form the snowman. Set aside.
- Sprinkle a little cornstarch on a clean, smooth surface. Pinch off a piece of red fondant, and roll it out into a long, thin rectangle. Use the craft knife to cut out a scarf for the snowman. Use the craft knife to cut little slits on each end for the scarf fringe.
- Use more dabs of water to attach the scarf to the snowman.
- Pinch off a tiny piece of orange fondant. Roll into a small tube, then pinch one end to make a carrot shape. Use a dab of water to attach it to the snowman's face.
- Pinch off two very small bits of black fondant and roll into circles to make eyes (attach with water). Alternatively, use a black edible marker to draw on the eyes. Set the snowman aside.
- Compare how tall your sugar ice cream cone is with how tall your bubble bowl is. If your sugar cone is just about as tall as, or taller than, your bubble bowl, carefully saw off enough from the open end to make it fit under the bowl.
- Take your remaining vanilla frosting. Add a few drops of forest green food dye and mix until evenly distributed.
- Fit the larger portion of the coupler inside your decorating bag. Snip off the tip of the bag where the collar of the coupler is. Fit your small open-star decorating tip on top of the coupler, and screw on the ring. Fill your bag halfway with the green icing.
- Set a piece of wax or parchment paper on a plate. Set down your sugar cone. Pipe stars all over the cone. Set in the refrigerator to chill for 10 minutes. Bring it out, and press the red bead sprinkles into the frosting, and place the star sprinkle on top. Set back in the refrigerator to harden some more.
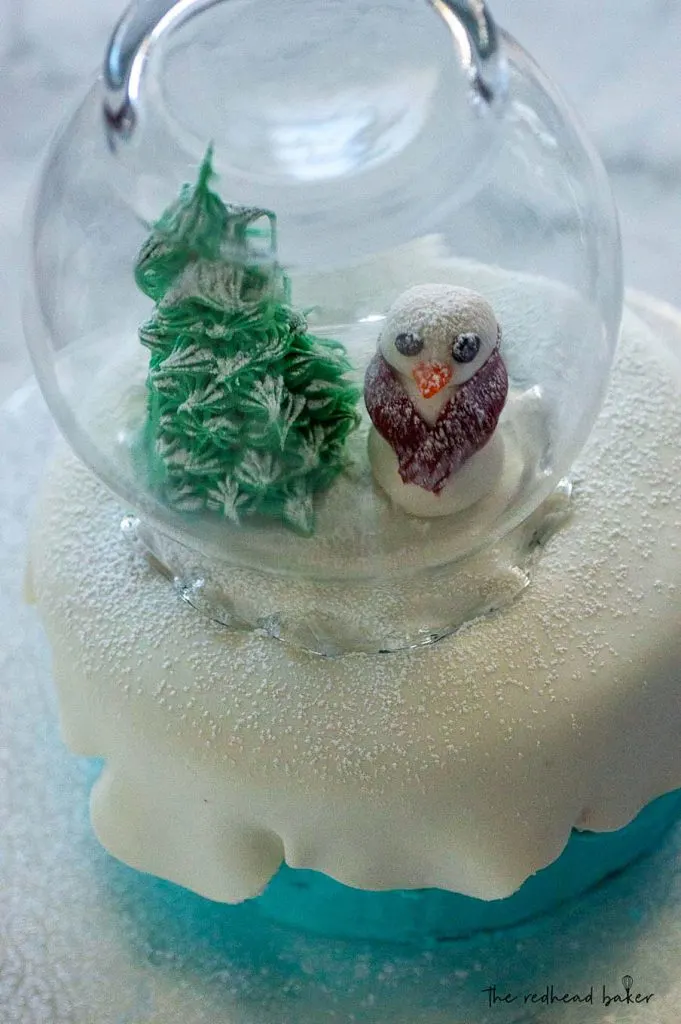
- Sprinkle some cornstarch on a clean, flat surface. Roll out the remaining white fondant into a square about 7 to 8 inches in diameter. Use the craft knife to cut a wavy edge all the way around.
- Lay the white fondant over the top of the cake, draping the edges over the sides to resemble snow.
- Place your snowman and tree in the center of your cake. Use a small fine mesh sieve to dust sugar over top of the tree.
- Place the bubble bowl on top of the cake.
Recommended Products
As an Amazon Associate and member of other affiliate programs, I earn a small percentage from qualifying purchases.


Enjoy these #ChristmasSweetsWeek recipes from our bloggers:
Christmas Beverages:White Cranberry Moscow Mule from Love and Confections
Christmas Breakfasts:
Sugarplum Pinwheels from Palatable Pastime
Christmas Pastries and Desserts:
Candy Cane Rice Krispies Treats from Hezzi-D's Books and Cooks
Caramel Gingerbread Cupcakes from Jolene's Recipe Journal
Dark Chocolate Peppermint Bread from Sweet Beginnings
Easy Red Velvet Crinkle Cookies from Blogghetti
Powdered Sugar Pound Cake with Pecans from Shockingly Delicious
Snow Globe Cake from The Redhead Baker
Christmas Candies:
Chocolate Saltine Cracker Toffee from Cheese Curd In Paradise
Gingerbread Truffles from Daily Dish Recipes
Anna
Thursday 12th of December 2019
Amazing! Perfect for a Christmas dinner table. Kids will definitely be delighted. Thank you for sharing the recipe, Coleen!