This post and recipe was created for #HalloweenTreatsWeek! This is a sponsored event but all opinions are my own.
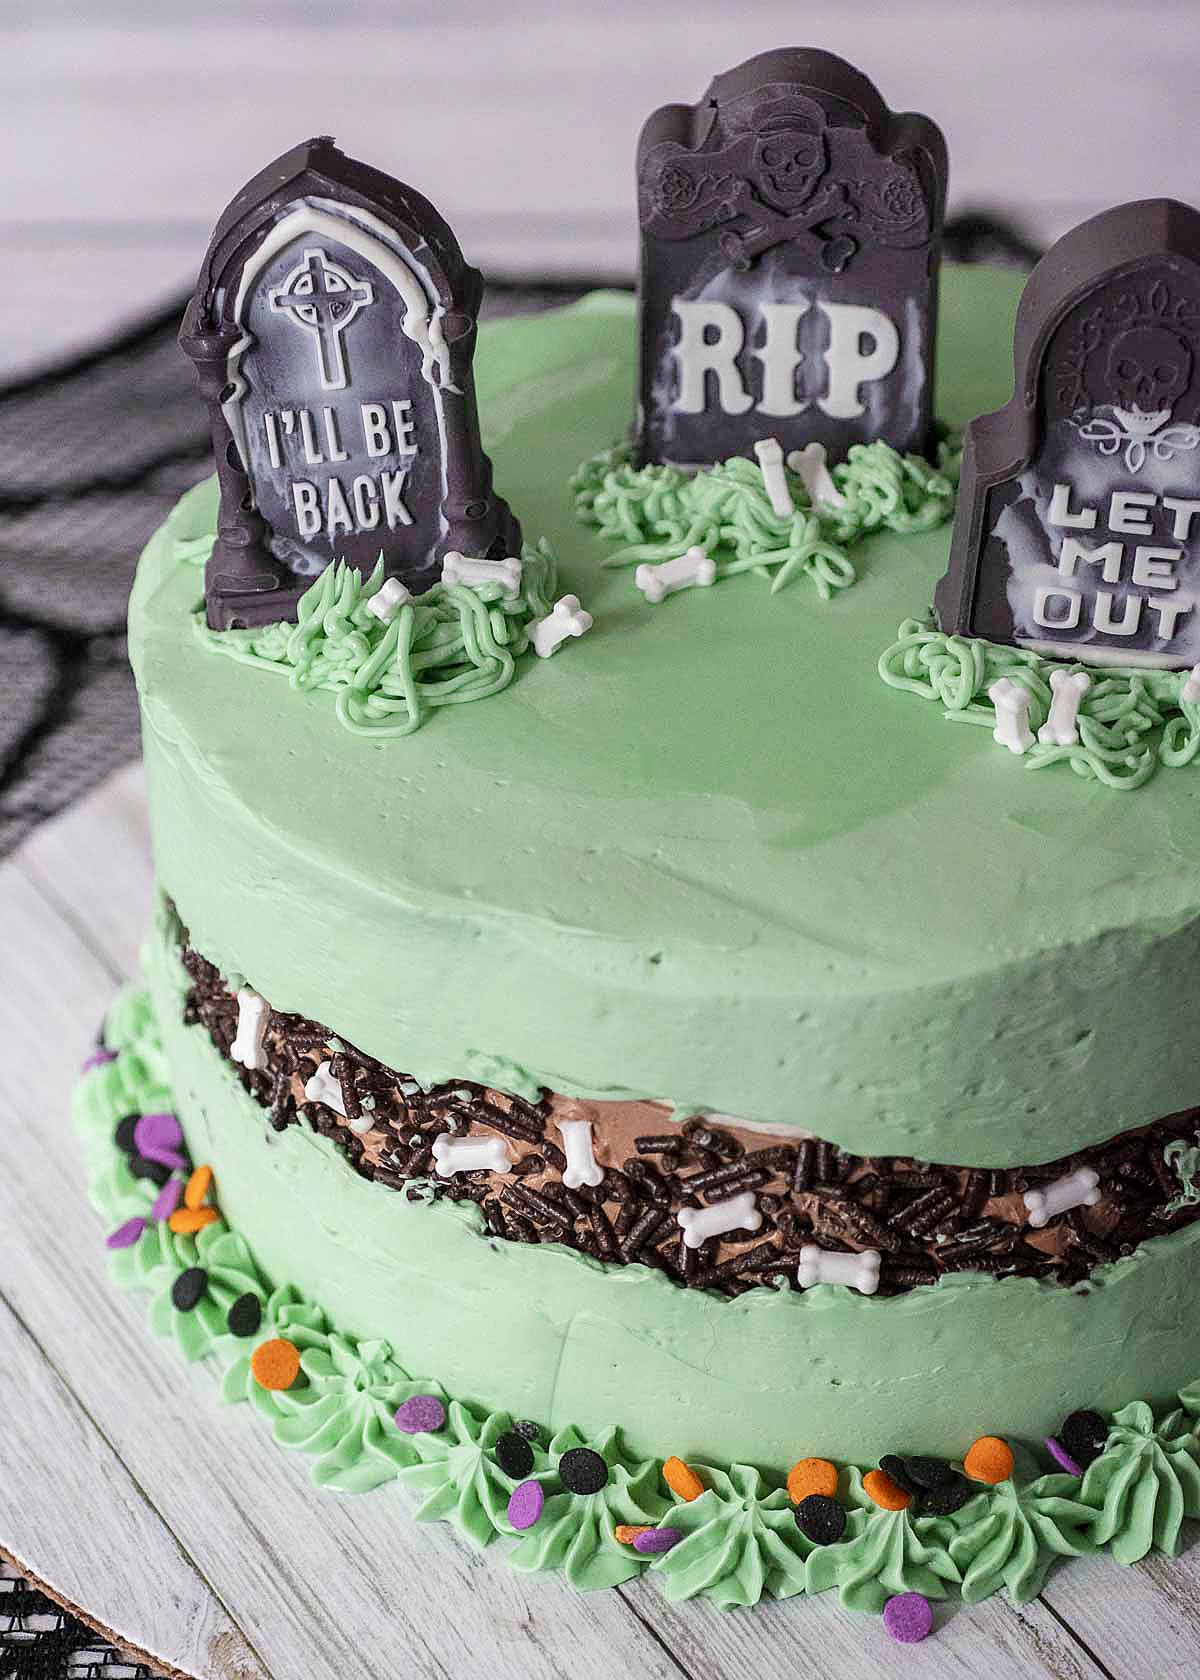
Find out how easy it is to make a spooky Halloween Fault Line Cake! The fault line reveals the dirt and bones under the graveyard.
Jump to:
#HalloweenTreatsWeek
It's October and that means .... Halloween is coming soon! It's time for spooky decorations, Halloween TV specials, and lots and lots of candy. It also means the return of Halloween Treats Week: Halloween cakes, cookies, cocktails and other goodies.
#HalloweenTreatsWeek is a yearly Halloween blogging event that is hosted by Angie from Big Bear’s Wife and it's a creepy and haunting week-long event is filled with some amazingly wicked Halloween treats, recipes and some frightfully fun giveaways.
For the 4th annual #HalloweenTreatsWeek event we have 28 hauntingly talented bloggers that are sharing their favorite Halloween recipes throughout the week!
Follow the hashtag #HalloweenTreatsWeek on social media and look at the bottom of each post to see all of the Halloween recipes that we’re sharing!
Giveaway Prize from Dixie Crystals
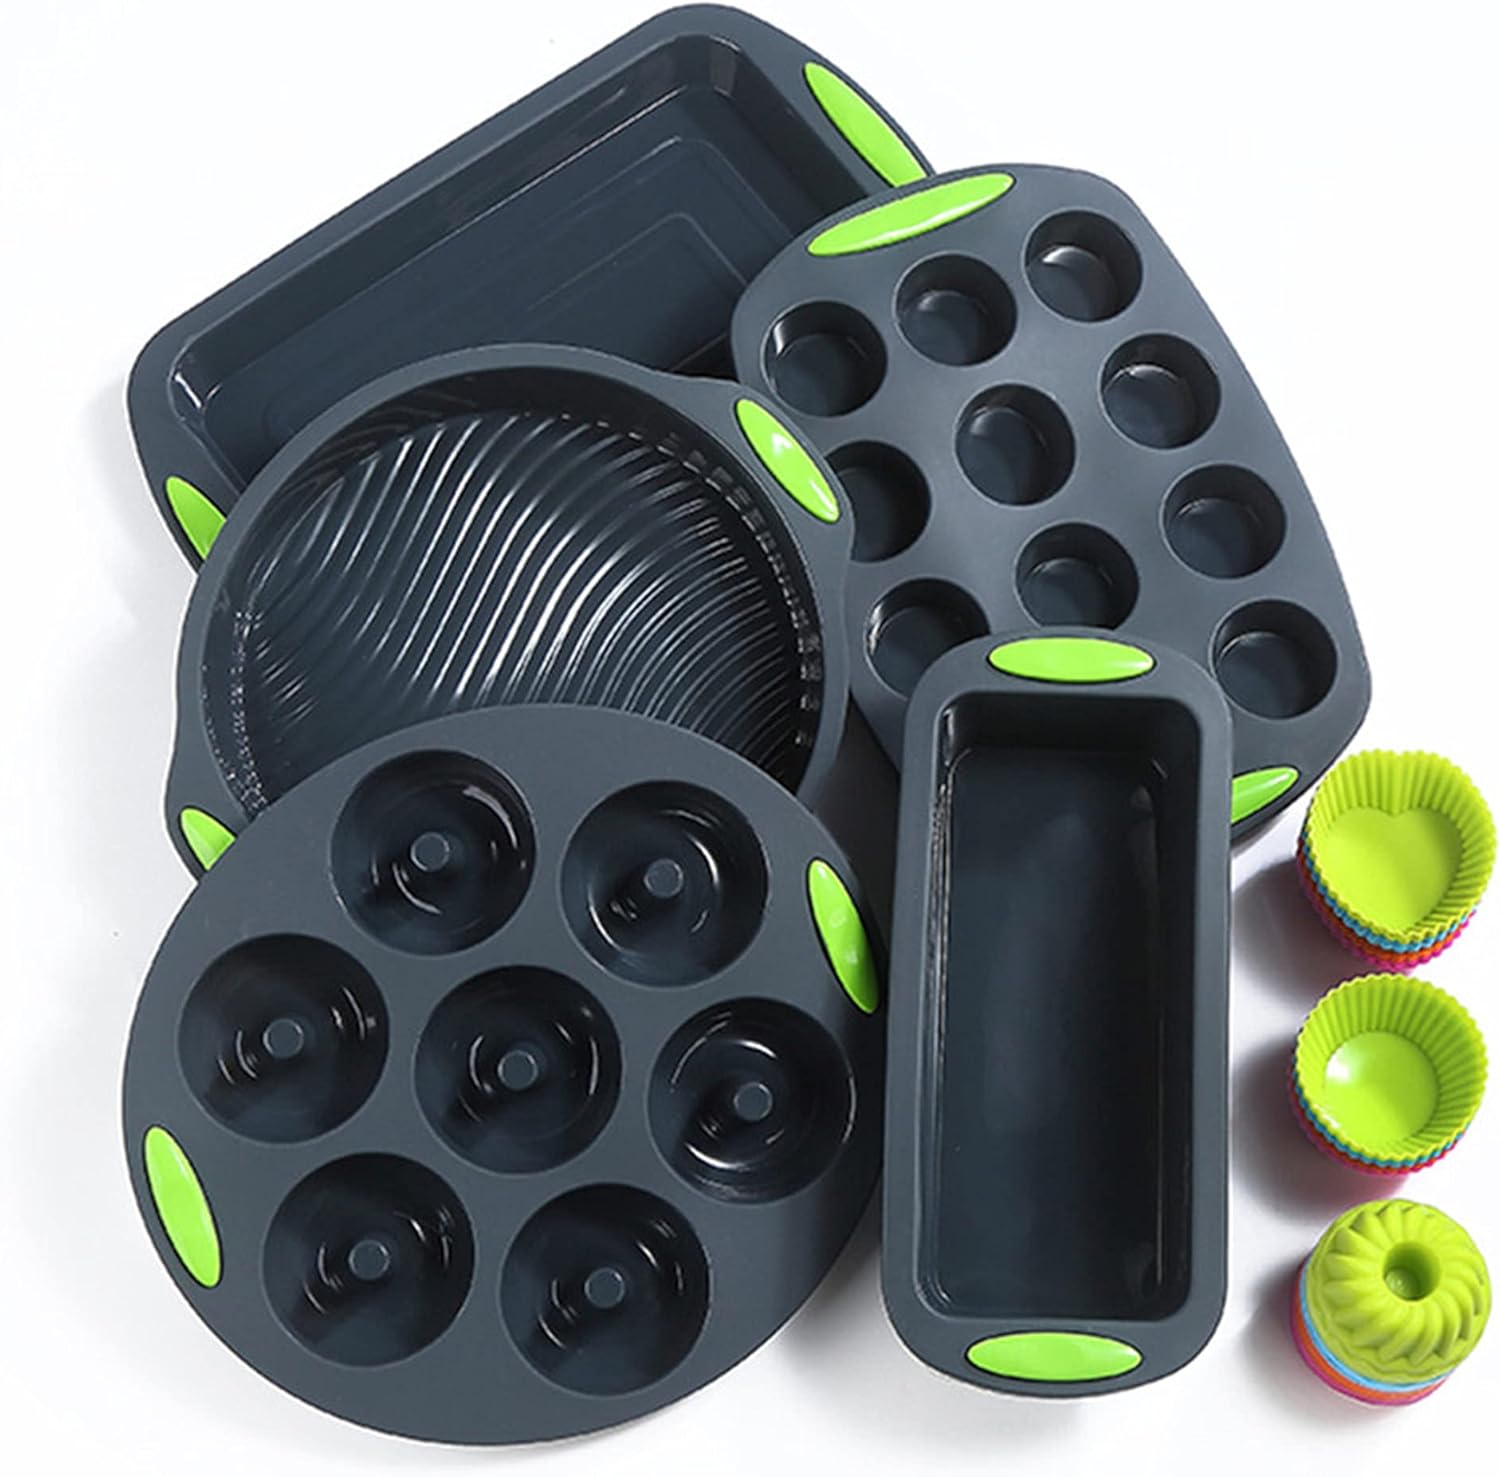
41 Pieces Silicone Bakeware Set
3 Piece Halloween Silicone Spatula Set
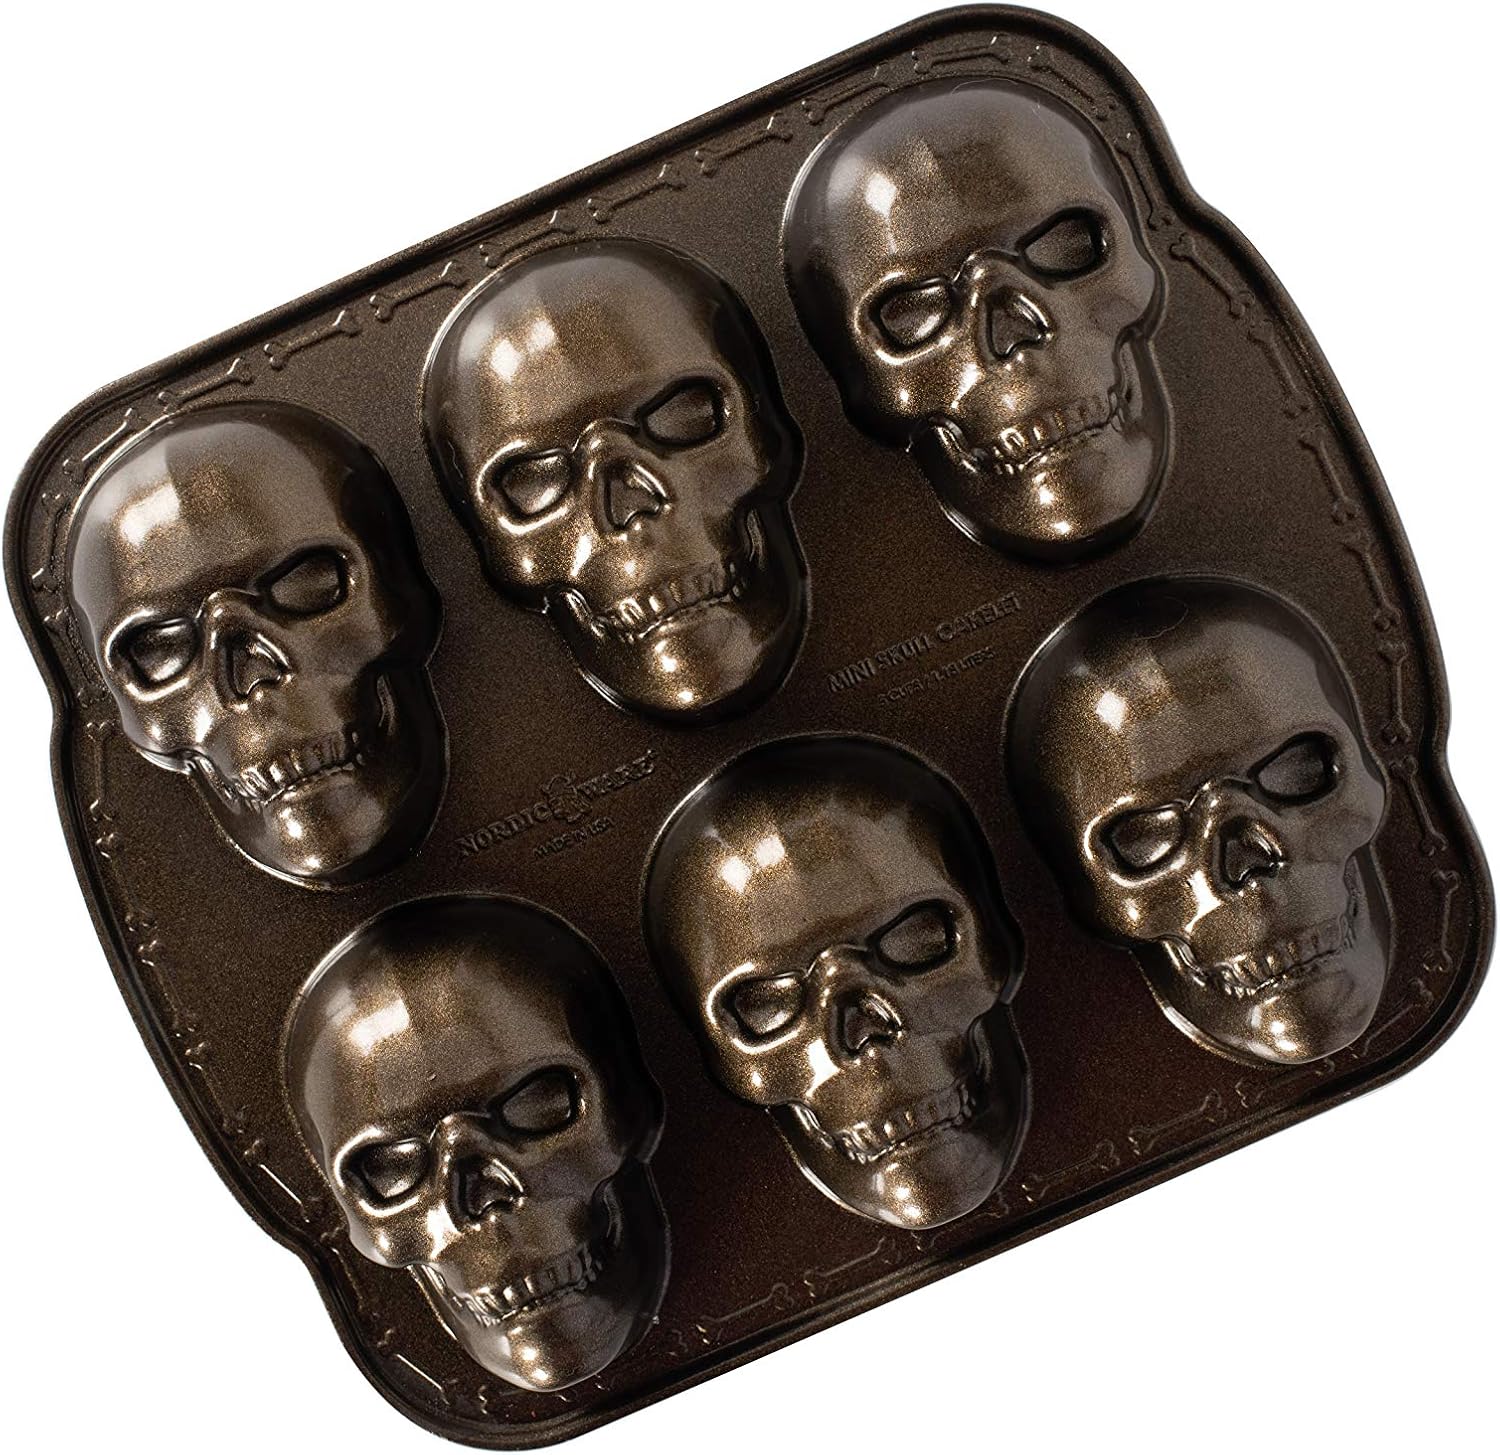
Nordic Ware Haunted Skull Cakelet Pan
Giveaway Entry
a Rafflecopter giveawayGiveaway open to US Residents 18 years or older. All entries will be verified. No PO Boxes Please. Prizes will be sent directly from sponsor to winner, bloggers are not responsible for prizes. This giveaway runs from October 11th - October 15th at 11:59PM EST. Winners will be selected soon afterward and contacted by e-mail. Winners will have 48 hours to respond or a new winner will be chosen. There are a total of 1 (ONE) prize pack and therefore we will have a total of 1 (ONE) winners. No purchase necessary. Void where prohibited by law.
Disclaimer: These posts and recipes are part of the week-long event, #HalloweenTreatsWeek but all opinions are 100% mine! We would like to Thank our amazing brand sponsors: Dixie Crystals that provided a prize pack for our giveaways and also sent some samples and products to the #HalloweenTreatsWeek bloggers to use in their recipes.
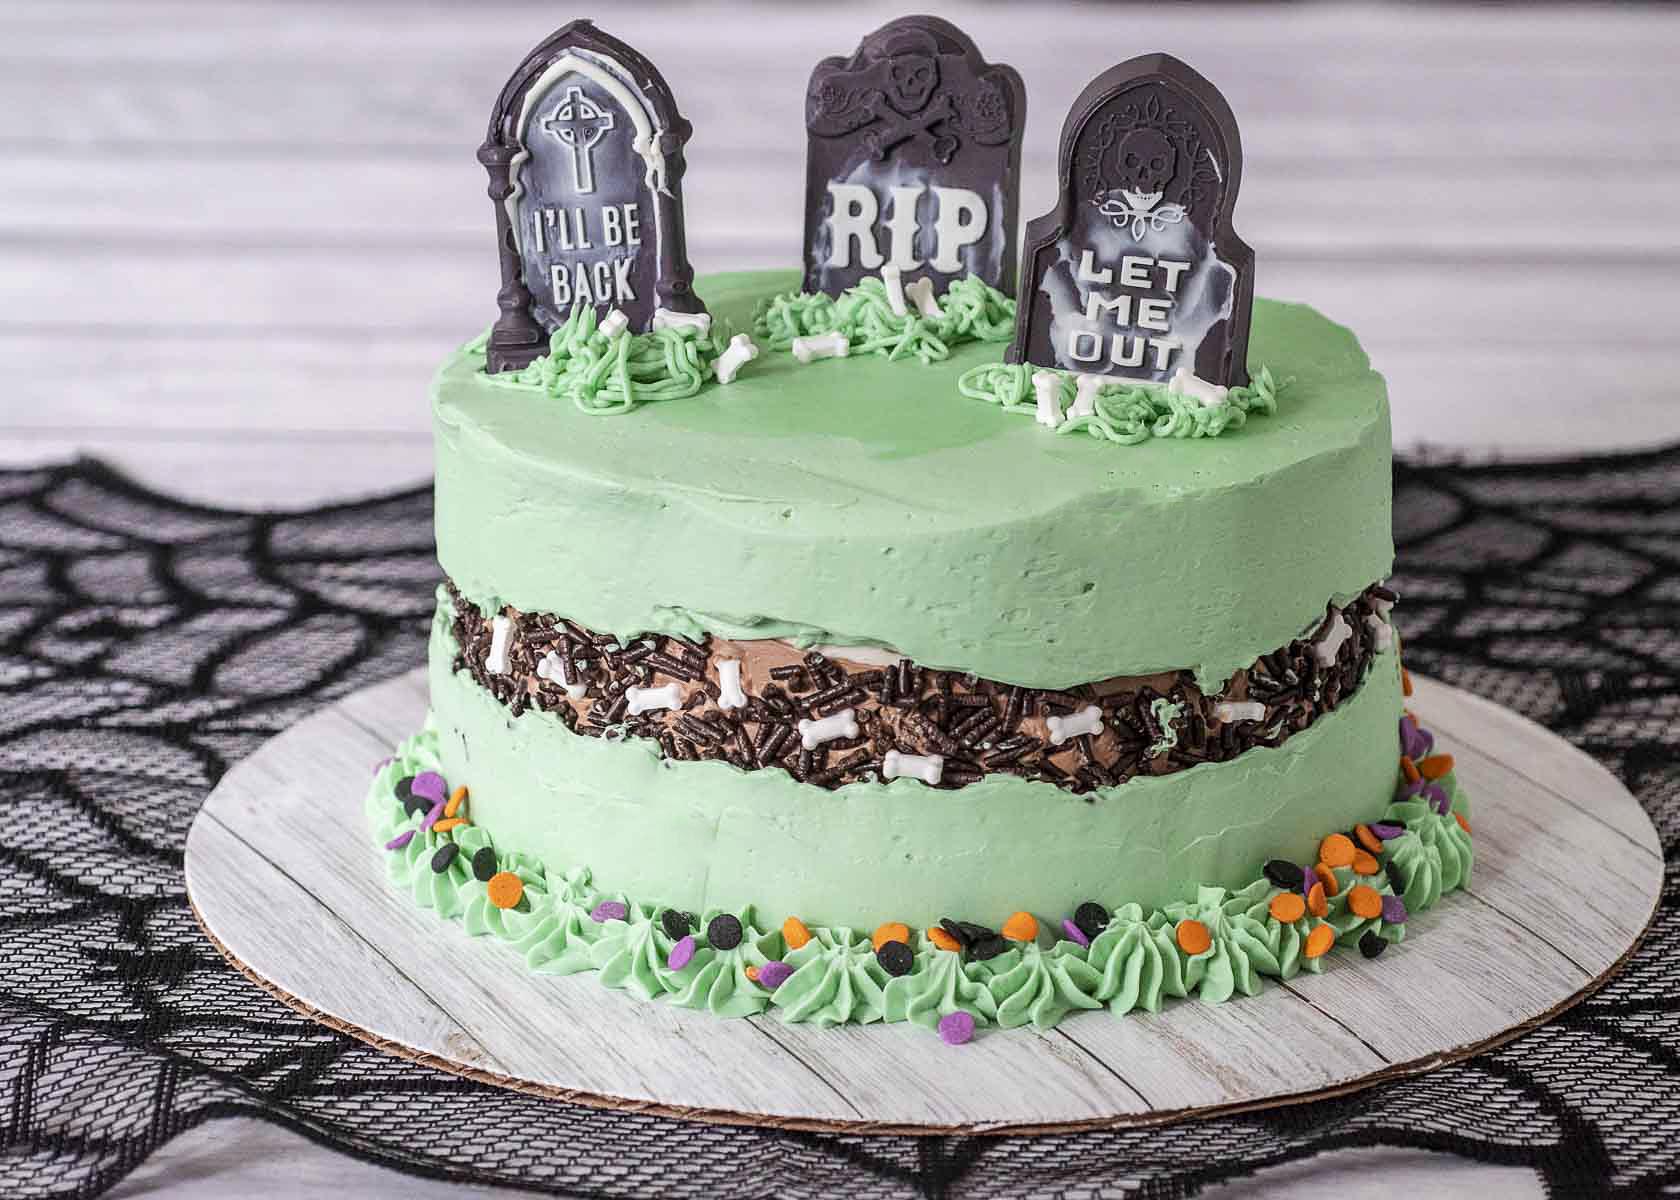
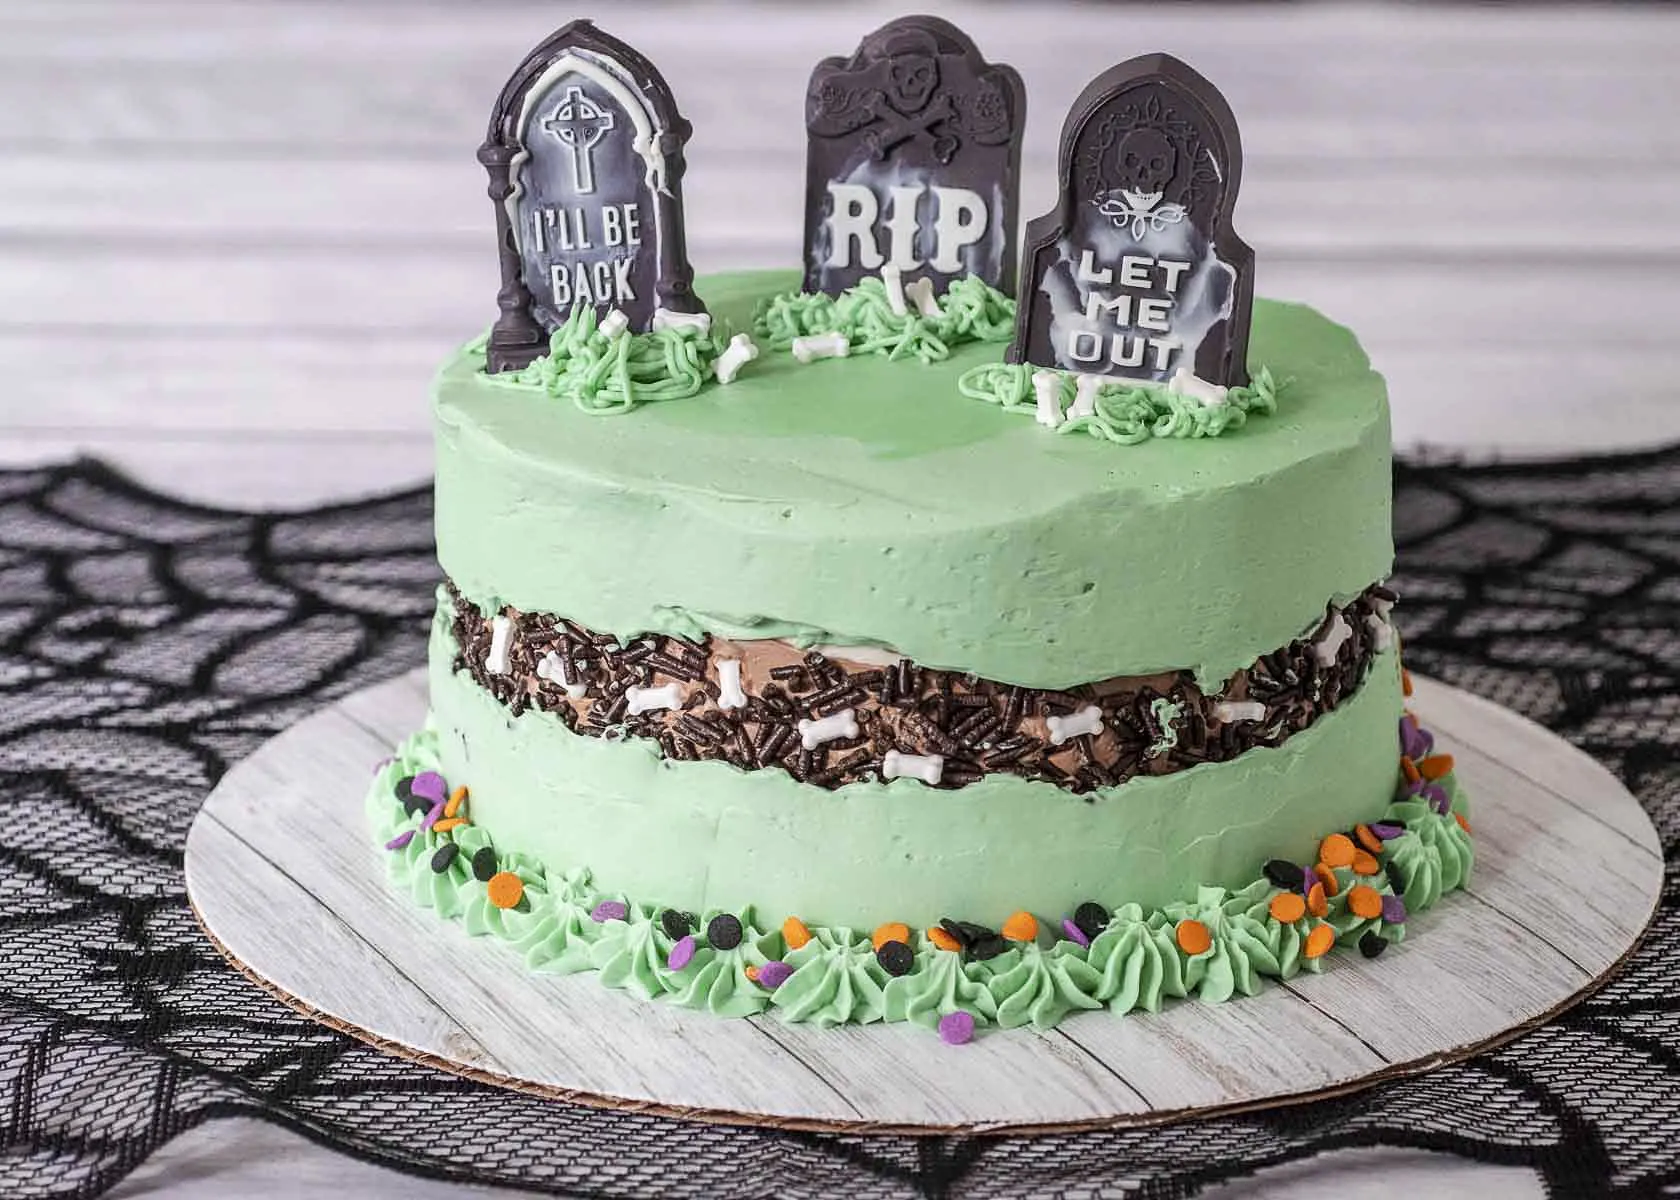
Graveyard Fault Line Cake
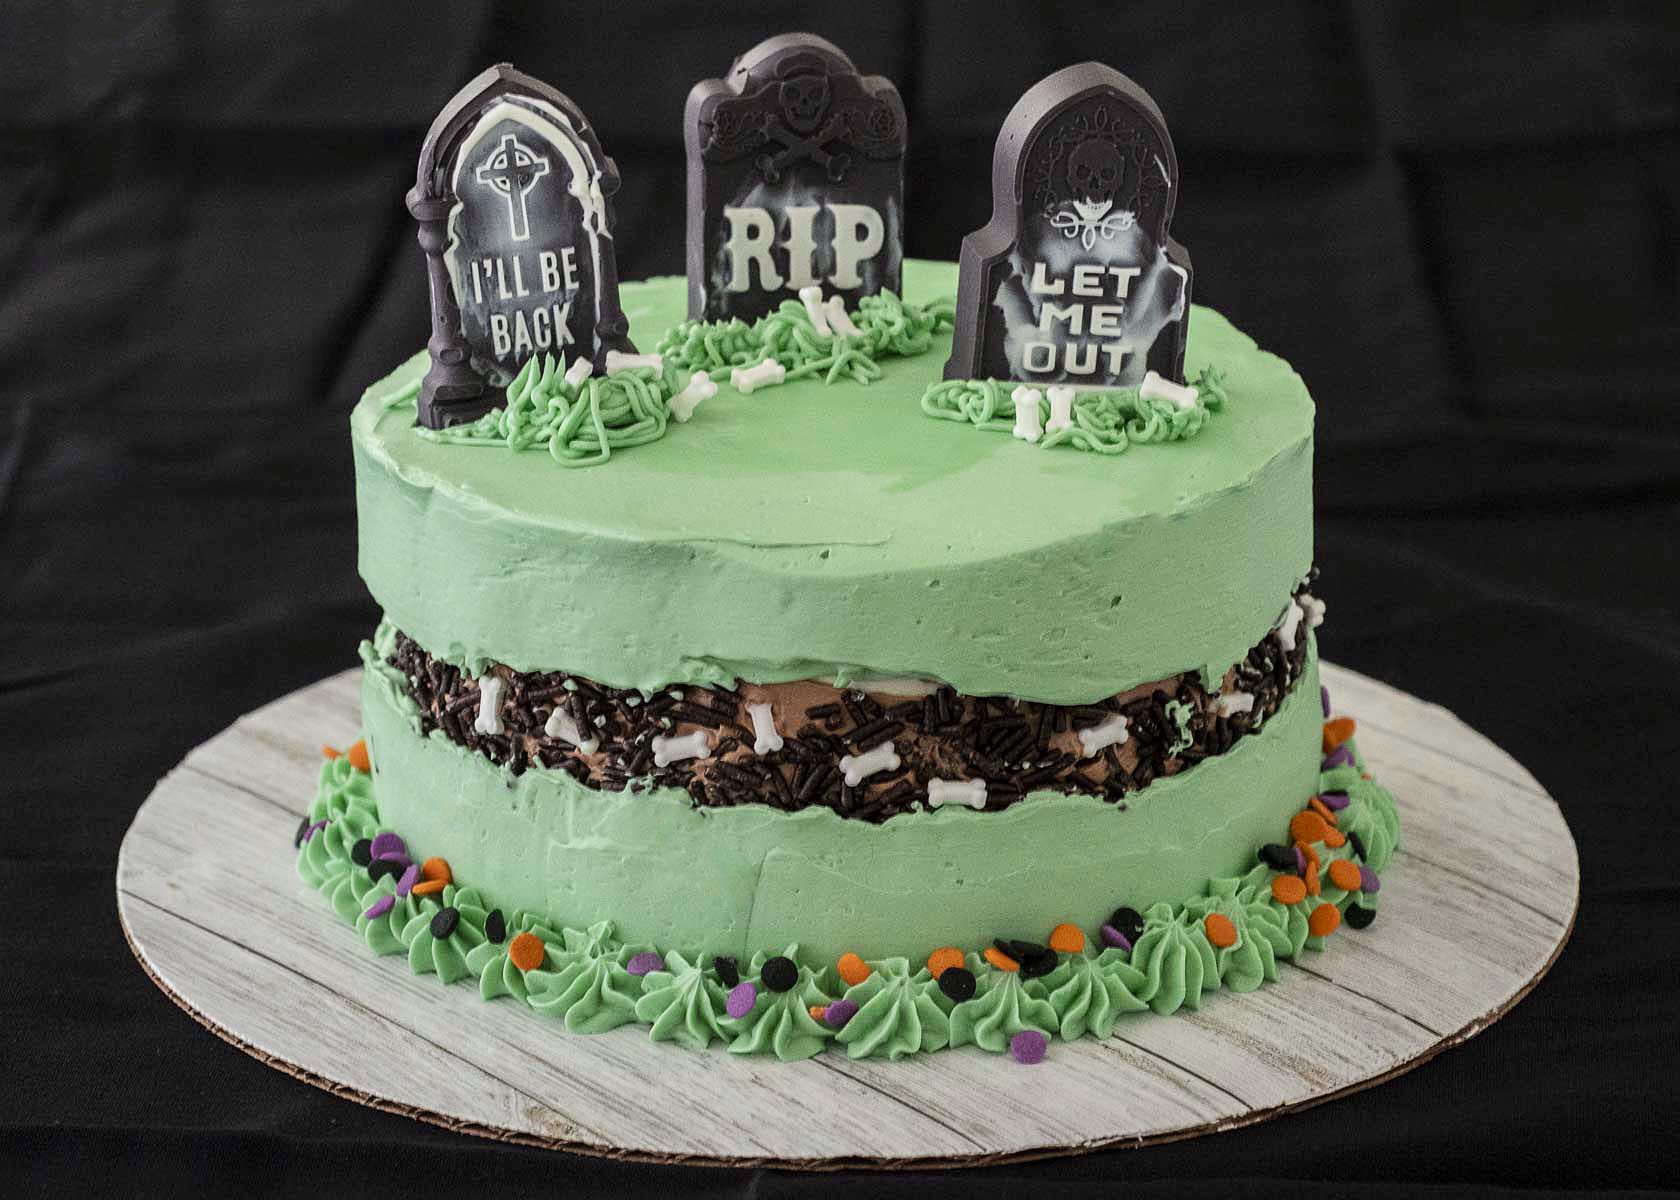
If you're having a celebration — at work, at home, or at school — and want to make an impressive cake, give this Halloween fault line cake tutorial a try. It's easier than it looks! At the top is a haunted graveyard, and in the middle of the cake, you get a peek underneath of the buried bones.
What You'll Need
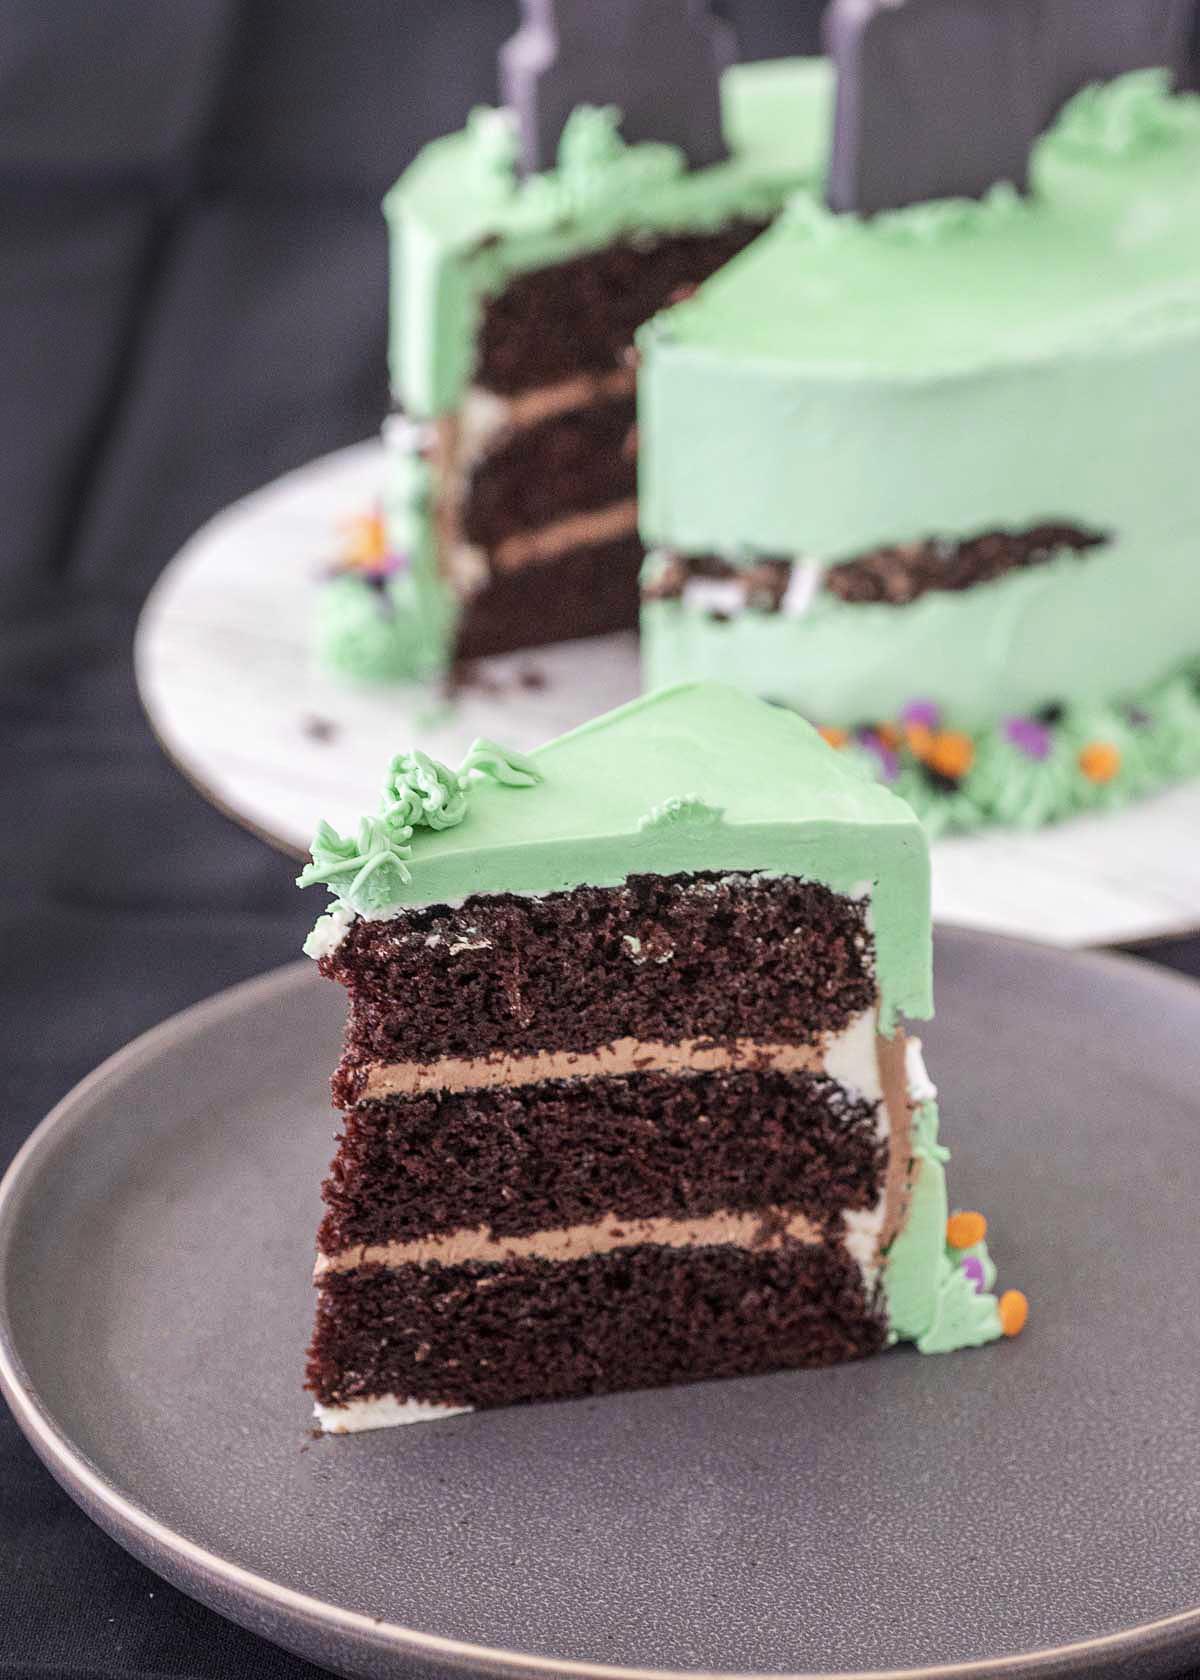
While this tutorial will be done using a triple-layer 6-inch cake, you can apply the technique to any size cake. I recommend using 3 layers of whatever size you choose, because you'll need the space for the fault line.

- Three layers of cake — you can use whatever chocolate cake recipe you prefer. I used my favorite chocolate cake recipe.
- Frosting — I recommend a good piping frosting, such as Swiss buttercream. I made one recipe (not scaled up or down), divided out 2 cups and flavored it with melted chocolate and still had frosting left over when I was done the cake.
- Green food coloring — I used Americolor gel food coloring in Leaf Green.
- Chocolate sprinkles
- Bone-shaped sprinkles
- Candy tombstones — I made my own with a silicone mold I found at a craft store, and candy melts. I wanted gray tombs, so I mixed a few white candy melts with a handful of black candy melts.
- Additional Halloween sprinkles for decorating the bottom border are optional.
Tools
A cake decorating turntable makes this project much easier. There are fancy, heavy-duty ones that tilt, but the simple plastic one I have from a craft store works perfectly well.
I prefer to ice my cakes with an offset spatula. A small offset spatula works for this size cake, but if you make 9-inch or larger cake layers, you may want the larger size. For smoothing the icing, I use a bench scraper.
You'll see in the video that I use a piping bag with a ribbon tip to apply the green icing. I find it easier and faster, but it's not required for this project.
For decorating the bottom of the cake, I used a small star tip (Wilton #21). For making the "grass" around the tombstones, I used a specialty decorating tip (Wilton #233). Again, both of these are optional.
How to Make a Fault Line Cake
Watch this video, or read the instructions below.
If you prefer text instructions, read them here with accompanying still shots from the video.


Stack the cake layers with ¾ cup of chocolate frosting between each layer. Cover the top and sides with a thin layer of white frosting. This is called "crumb coating."

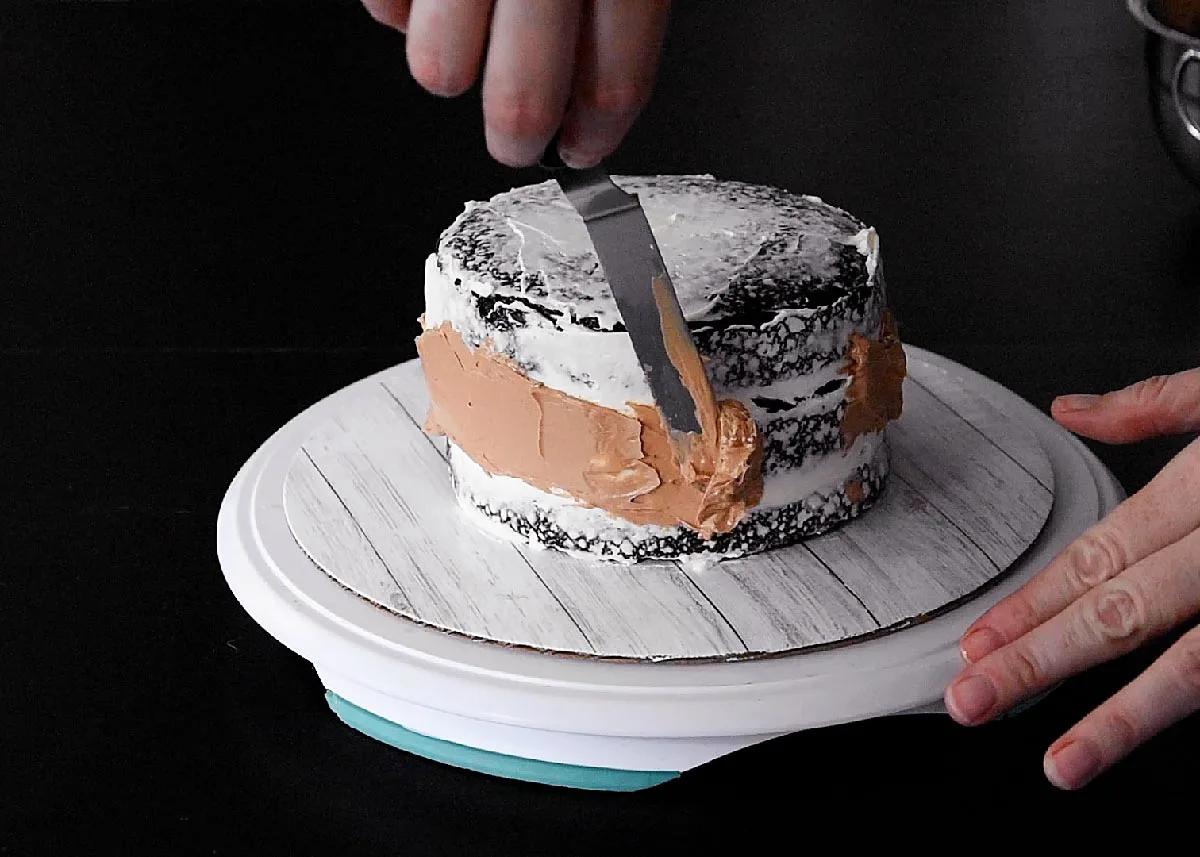
Spread a 1-inch tall "ribbon" of chocolate frosting around the middle of the cake. Smooth with a bench scraper, then pat chocolate sprinkles in the frosting. Chill for 30 minutes.
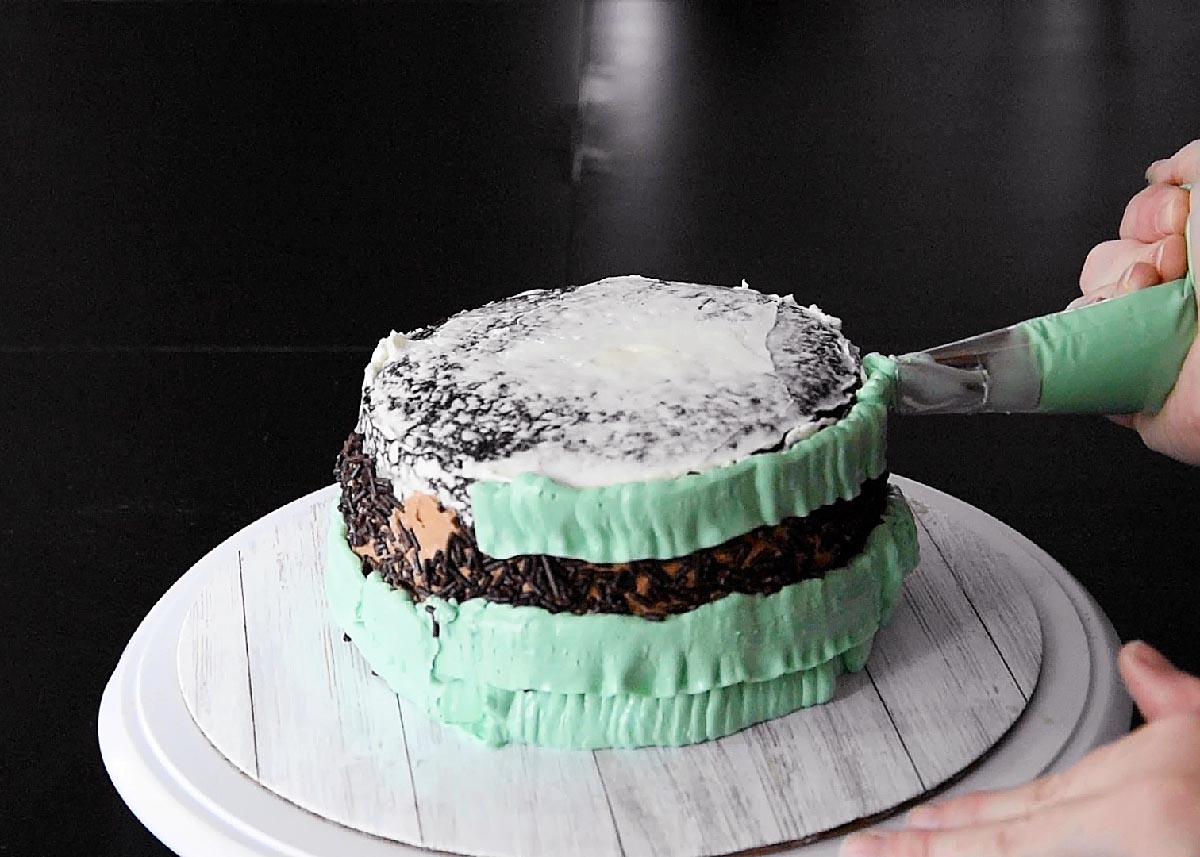
Spread a thick layer of green frosting around the bottom (beneath the chocolate ribbon) and the top (above the chocolate ribbon), slightly overlapping the chocolate. Spread it thick enough so that when you smooth it with the bench scraper, you don't touch the sprinkles on the chocolate ribbon. After smoothing, chill for 30 minutes.
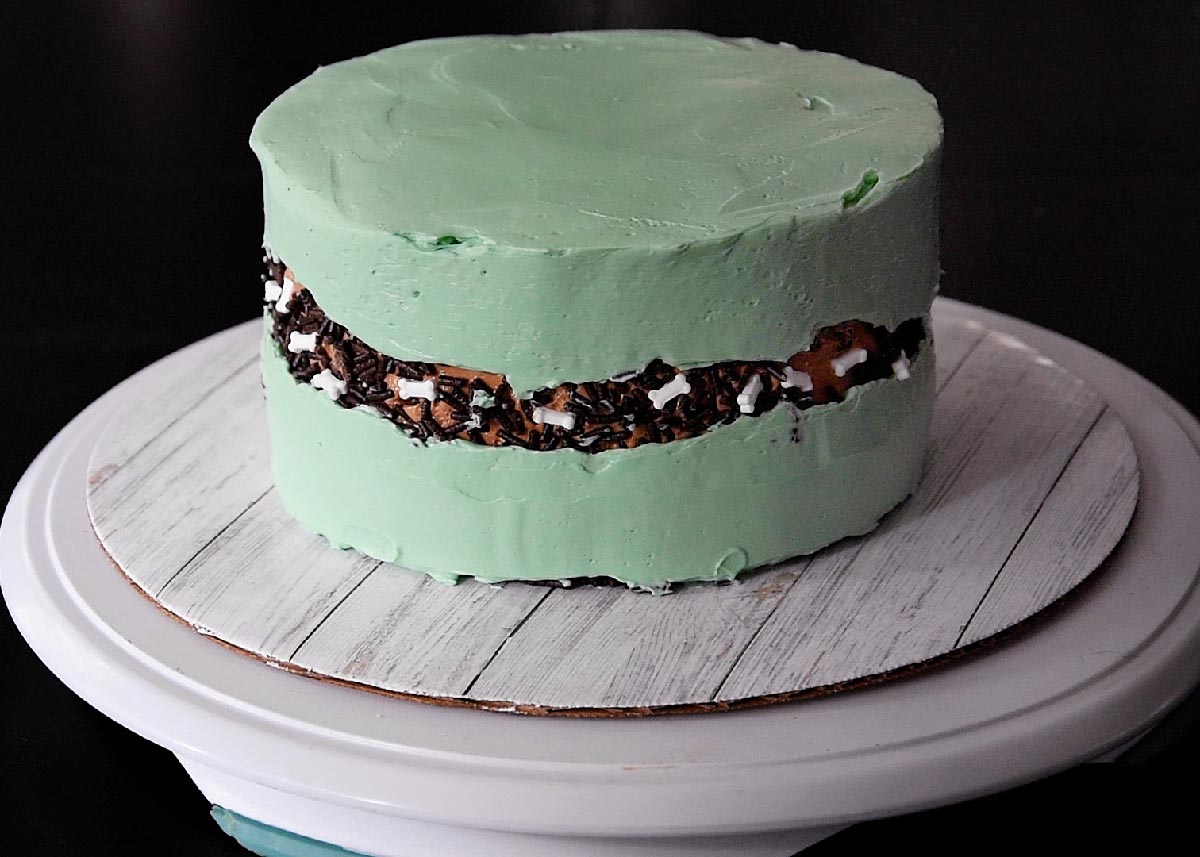

Place bone-shaped sprinkles among the chocolate sprinkles. If desired, pipe a border along the bottom of the cake and decorate the top with candy tombstones and additional bone-shaped sprinkles.
Storage
Store the cake in the refrigerator until ready to serve. Store any leftovers in the refrigerator, pressing a piece of plastic wrap against the cut side of the cake to prevent it from drying out.

Top tip
Give yourself time to make this Halloween fault line cake. Make the cake layers up to two days in advance. Wrap them tightly in plastic wrap and store at room temperature.
If you make your own candy tombstones, those can be made up to 3 days ahead of time and stored in the refrigerator.
I prefer to make the frosting early in the day I plan to assemble the cake. I find it spreads and smooths out easiest on the day it is made.
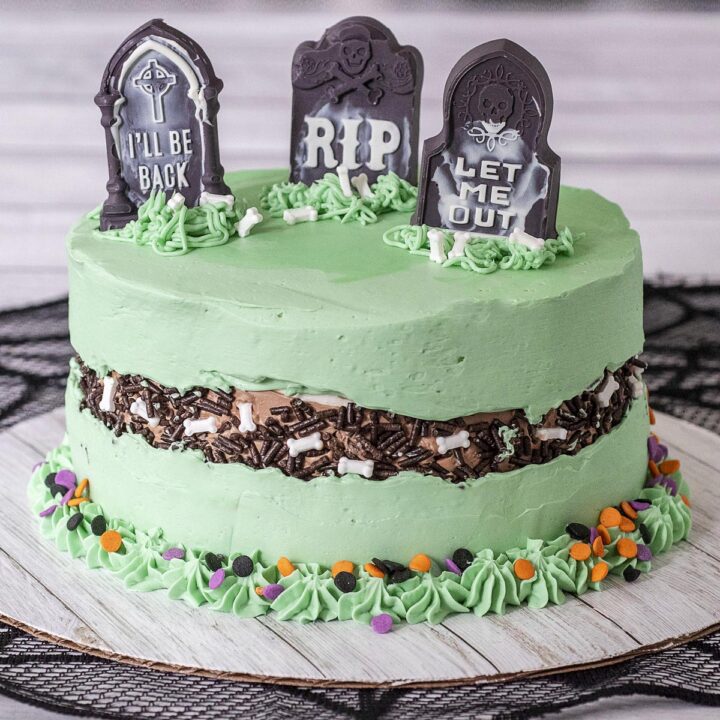

Halloween Graveyard Fault Line Cake
Find out how easy it is to make a spooky Halloween Fault Line Cake! The fault line reveals the dirt and bones under the graveyard.
Materials
- 3 (6-inch) chocolate cake layers
- 3 cups vanilla frosting
- 2 cups chocolate frosting
- Green food coloring
- Chocolate sprinkles
- Bone-shaped sprinkles
- Candy tombstones
Tools
- Cake decorating turntable
- Cake plate or decorative cake board
- Offset spatula
- Bench scraper
- Piping bags
- Wilton cake ribbon/basketweave tip #1D or #2B
Instructions
- Stack the cake layers with about ¾ cup of chocolate frosting between layers. Coat the sides and top of the cake with a very thin layer of vanilla frosting. Refrigerate for at least 30 minutes.
- Spread a layer of chocolate frosting along the middle of the side of the cake, about 1 inch in height. Smooth with a bench scraper.
- Pat chocolate sprinkles onto the chocolate frosting. Refrigerate at least 30 minutes.
- Tint the remaining vanilla frosting green.
- Fit a piping bag with a plain ribbon tip (or a basketweave tip with a plain side). Fill halfway with green frosting.
- Pipe a ribbon of green frosting along the bottom of the cake side, below the chocolate frosting, and another ribbon along the top, above the chocolate frosting. It's fine to slightly overlap the chocolate. The green frosting layer should be thicker than the chocolate. Frost the top of the cake with green frosting.
- Gently smooth the green frosting with a bench scraper, ensuring you don't touch the chocolate sprinkles.
- Carefully place bone shaped sprinkles among the chocolate sprinkles.
- If desired (and if you have remaining green frosting), pipe a small border along the bottom edge of the cake with a star tip or a plain round tip.
- Decorate the top of the cake with candy tombstones and additional bone sprinkles if you choose.
- Store cake in the refrigerator until ready to serve. Refrigerate any leftovers.
Notes
If you can't find pre-made candy tombstones, you can make your own with a silicone mold, and candy melts.
Recommended Products
As an Amazon Associate and member of other affiliate programs, I earn a small percentage from qualifying purchases.


Check out all of these great #HalloweenTreatsWeek recipes for today:
- Disney Villain Charcuterie Board from Big Bear's Wife
- Grave Yard Snack Mix from Semi Homemade Recipes
- Jelly Filled Ghost Donuts from Jen Around the World
- Cake Top Forward Halloween Cake from Pint Sized Baker
- Witch Finger Pretzels from Fresh April Flours
- Caramel Apples from Devour Dinner
- Easy Frankenstein Cupcakes from Hezzi-D's Books and Cooks
- Blood & Guts Cinnamon Rolls from 4 Sons 'R' Us
- Bloody Vampire Cherry Floats from Cookaholic Wife
- Candy Corn Cookies from Eat Move Make
- Halloween Chocolate Covered Pretzel Rods from House of Nash Eats
- Friday the 13th Pancakes from Cheese Curd In Paradise
- Spider Donuts from The Flour Handprint
- Haunted House Cake from Sweet ReciPEAs
- Peanut Butter Ghost Cookies from Karen's Kitchen Stories
- Apple Spice Cake Donuts from It's Shanaka
- Pumpkin Patch Cookie Cups from Sweet Beginnings
- Candy Corn Butterfinger Bark from Pastry Chef Online
- Spiderweb Cheesecake from The Spiffy Cookie
- Peanut Butter Chocolate Mummy Cookies from Strawberry Blondie Kitchen
- Oozing Red Velvet Cake from A Kitchen Hoor's Adventures
- Black Velvet Cake from Lemon Blossoms
- Monster Burgers from An Affair from the Heart
- Spider Web Soup (Roasted Pumpkin Tomato Soup) from I am a Honey Bee
- Candy Corn Fudge from Back To My Southern Roots
- Dark Chocolate Black Cat Cookies from Savory Moments
- Three Ingredient Pumpkin Cookies from Our Good Life
- Binx Marshmallow Fudge Brownies from For the Love of Food
Jenni
Monday 11th of October 2021
What a spooky-cute cake! And I love those headstone toppers, too!